DISCLOSURE:

Several affiliate links are used in my posts. This means that, if you click on one of my links and make a purchase from that company, I will receive a small percentage of the sale without any additional charge. I appreciate your support greatly.

Sunday, February 2, 2025

Sending Hugs

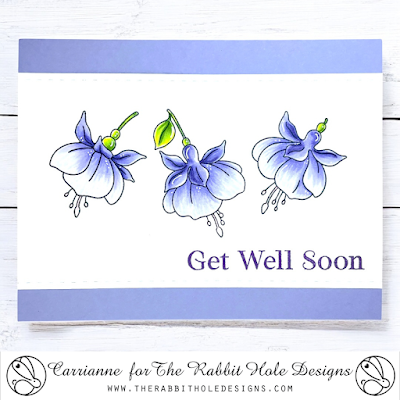
Hi friends! Today, I’m excited to share a clean and simple design featuring the Fabulous Fuchsias Stamp and Die set from The Rabbit Hole Designs. This set is absolutely gorgeous and full of vibrant blooms. It's perfect for making stunning cards with ease!


For this one-layer card, I began by stamping the two largest fuchsias from the set, aligning them vertically to creating a balanced design. Once stamped, I used Copic Markers to color the flowers, adding subtle shading and depth with my Prismacolor pencils to enhance the details.

Next, I selected the middle-sized frame from the You've Been Framed Layering Die and carefully cut out the panel. To add a touch of contrast, I adhered it to a vibrant pink mat before attaching the whole piece to an A2 card base, giving it a bold, eye-catching finish.


The sentiment, from the Sentimentally Speaking Stamp Set, was stamped in bold black ink and then die-cut using the coordinating dies. I carefully adhered it to the panel with liquid adhesive, placing it just right for a balanced, polished look.

To complete the card, I scattered some clear sequins across the design, adding just the right amount of sparkle and a touch of elegance.


Don’t miss out—shop now and save 10% on your entire purchase with code CARRIANNE10! Happy shopping!

Thanks so much for stopping by! Have a Fabulous day!


I Love You More than Chocolate

Welcome back to a brand new challenge at Lil Patch of Crafty Friends! As always, it’s an Anything Goes challenge, and we have an amazing sponsor, Polkadoodles! They’re offering 3 digital images to one lucky winner. I can’t wait to see all your creative entries, so remember to have fun! Happy crafting!

I printed the image and colored it with Prismacolor pencils to achieve a soft, subtle shade. Afterward, I cut it out using a stitched circle die.


Next, I dug through my stash for some festive Valentine’s paper and layered it onto a white A2 card base, creating a bright and cheerful backdrop. I then cut a slightly larger stitched circle from vellum to frame the focal image. I carefully adhered the focal image circle to the vellum using liquid adhesive, and then adhered it to the panel with adhesive tape. 


The sentiment was heat-embossed on black cardstock using white embossing powder, then die-cut with a scalloped sentiment die.


Be sure to visit the blog for even more inspiration from our amazing design team! There are so many fantastic ideas and creative projects to help inspire your next crafting adventure!

Thanks so much for stopping by! Wishing you a wonderful day filled with creativity and joy!

CHALLENGES:
Park Hopping My Happy Place - Country Bear Jamboree
Allsorts - #816 Romance
Crafty Calendar - February *Hearts 
Di's Digi Challenge - Have a Heart


I Love You Truly

Welcome back to another Colorful Options Challenge! This month, in celebration of Valentine’s Day, we’re focusing on the color that symbolizes romance, sweetness, and love—pink! But if pink isn't your thing, don’t worry—you can always opt for the alternative rainbow theme for a burst of color!

My card features the Ever Thine Stamp Set from Colorado Craft Company. I just love the adorable sweetness of the mice—they add the perfect touch of charm and whimsy to the design!


I stamped the images and colored them with Prismacolor pencils for a soft, delicate look. The smooth shading gave the mice a gentle, almost vintage feel, perfect for the romantic theme of the card.

I took another panel and masked off a portion using masking tape. Then, I blended Picked Raspberry, Kitsch Flamingo, and Spun Sugar Distress Oxide Inks to create a soft, gradient background. Next, I placed the Fluttering Hearts Stencil from Honey Bee Stamps over the panel and blended more Picked Raspberry ink through the stencil for a deeper, more vibrant color, adding some texture and dimension to the design.


After removing the stencil, I stamped the sentiment from the Ever Thine set directly onto the panel. I trimmed the panel to create a clean border and then adhered it to an A2 white card base for a crisp, finished look. To give the card some dimension and interest, I popped the colored images up on foam tape, allowing them to stand out beautifully against the background.


Be sure to visit the blog for even more inspiration from our amazing design team! There are so many fantastic ideas and creative projects to help inspire your next crafting adventure!

Thanks so much for stopping by! Wishing you a wonderful day filled with creativity and joy!

CHALLENGES:
SSS Monday Challenge - Have a Heart
Park Hopping My Happy Place - Ratatouille Ride 
Crafts Galore - February #132
Allsorts - #816 Romance
Crafty Calendar - Feb *Hearts
Di's Digi Challenge - *Have a Heart
Dream Valley - #329 Pink


Saturday, February 1, 2025

With Love

The newest release from Lili of the ValleyFluffy Kisses, is now available! This collection is packed with the most adorable bunny images that are guaranteed to make you smile and melt your heart.


For this card, I used the Little Rose digital image, which was such a joy to create with. I wanted to keep the design clean and simple so that the sweet bunnies would really take center stage. After coloring the image with Copic Markers, I cut it out using a rectangle die for a crisp, clean edge. I then cut another panel, adhering the two layers together with liquid glue to give the card some nice dimension. 


For the background, I chose a pretty paper from my stash and die-cut it with the PhotoPlay Nested Stitched Scallops Die to add some extra texture. Once the layers were all assembled, I adhered the whole piece to an A2 card base for a polished, finished look.

The sentiment is part of the set, but I trimmed it down to simply say 'With Love' to match the clean and simple style. I adhered it to the panel using liquid glue, allowing the sentiment to complement the design without overpowering it.


Thank you for stopping by! Wishing you a wonderful day filled with creativity and joy!


CHALLENGES:
Crafts Galore - #132 AG
Allsorts - #816 Romance
Dream Valley - #329 Pink


Groundhog Day: Will He See His Shadow?

Hey friends! Today, I’m sharing a fun critter card inspired by the Wacky Holidays Card Hop. In this hop, we get to choose a holiday that often flies under the radar and give it the attention it deserves! So excited to show you what I came up with!

I decided to celebrate Groundhog Day, which takes place every year on February 2nd in the U.S. and Canada! Every year, I make sure to tune in to my local news channel to see what Phil predicts. Will we get six more weeks of winter, or is spring just around the corner? I’m definitely hoping for some warmer weather and that Phil stays outside this year! How about you? Do you want an early spring, or are you hoping for a little more winter?

For this card, I used the Dare 2B Crazy Groundhog Garden Stamp Set. I stamped the images and colored them with Copic Markers to bring them to life, then used my Scan N Cut machine to effortlessly cut them out.


For the background, I began with a panel of Neenah Solar White #80 cardstock, then cut the Storyboard Backdrop die from another panel to use as a stencil. I blended a bright, spring-inspired background using Distress Oxide inks in Salty Ocean and Twisted Citron, creating a vibrant mix of blues and greens for a fresh, lively feel

Next, I cut another panel using the same Storyboard Backdrop die and carefully adhered it on top of the previous die-cut for added dimension. I then attached the layered die-cut piece to the blended panel, creating a bit of depth and texture that really makes the design pop.


For the sentiment, I heat embossed it with black embossing powder, giving it a nice shiny look. Finally, I adhered the images to the panel with liquid adhesive, popping a few up with foam tape to add some fun dimension.


Thanks for stopping by! Have a sunny-side-up kinda day!

CHALLENGES:
Crafty Catz - #686 *Blue and Green
Park Hopping My Happy Place - Animal Kingdom Park