Hello Crafty Friends!
I am thrilled to say that I have completed all of my courses and have made it to the final challenge for Level 1 in the Altenew Educator Certification Program.
For the final challenge, I have been instructed to create a set of masculine cards and a set of feminine cards, each consisting of 4 to 6 cards. I am required to select three components from the Level I classes and explain them. Additionally, I am required to incorporate a recycled component in either a set or gift packaging.
When I think of masculine cards, I see dark and bold colors so for my HIS gift set I chose blue, green, red and black. To maintain the cohesiveness of the feminine set, I selected identical colors, however, I opted for a lighter shade.
It proved to be challenging to select three components as there were numerous helpful techniques available. Despite being required to select three, I opted to employ several additional techniques in certain cards, and I shall elaborate on each one in greater detail in my cards.
The following techniques will be used on my cards:
1. For the Guys - Using Geometric Images, stamp positioner for solid images and ruler for perfect alignment
2. Easy Die Cutting Techniques - Negative Die Cutting and Embossing with Dies
3. Scene Building - Backgrounds with stamps, dies & ink blending, creating scene using frames, layering elements for dimension.
4. Celebration Stencil Techniques - Using Stencil Overlay and Stamping with watercolor
I used a different technique for each set of cards to showcase more of what I learned from each course. I will explain how I used the techniques while keeping them cohesive throughout my sets.
Gift Set #1 - For The Guys
Celebration cards
MASCULINE
For my masculine card, I created a geometric background using Altenew Shades of Friendship. This set was perfect for demonstrating a technique from the For the Guys course with Jennifer Rzasa. I needed to determine the center of my panel, so I pulled out my ruler and Altenew Stampingwheel and used a pencil to lightly mark where I would begin stamping the image. I found using a ruler and tool helpful in preventing me from making mistakes. I alternated between different colors and stamped the image according to my guidelines. After I completed the background, I erased my pencil marks.
I blended Altenew Navy Fresh Dye Ink around the edges of a panel, cut it out using a large frame die and adhered it to the panel with foam strips for dimension. The sentiment is from Altenew Timeless Sentiments 2. An ombre effect was achieved by blending the navy ink onto an area of cardstock (Easy Ink Blending Techniques). I cut the shadow from vellum and attached them with glue. I positioned the sentiment in the center and the sub-sentiment slightly to the right above it.
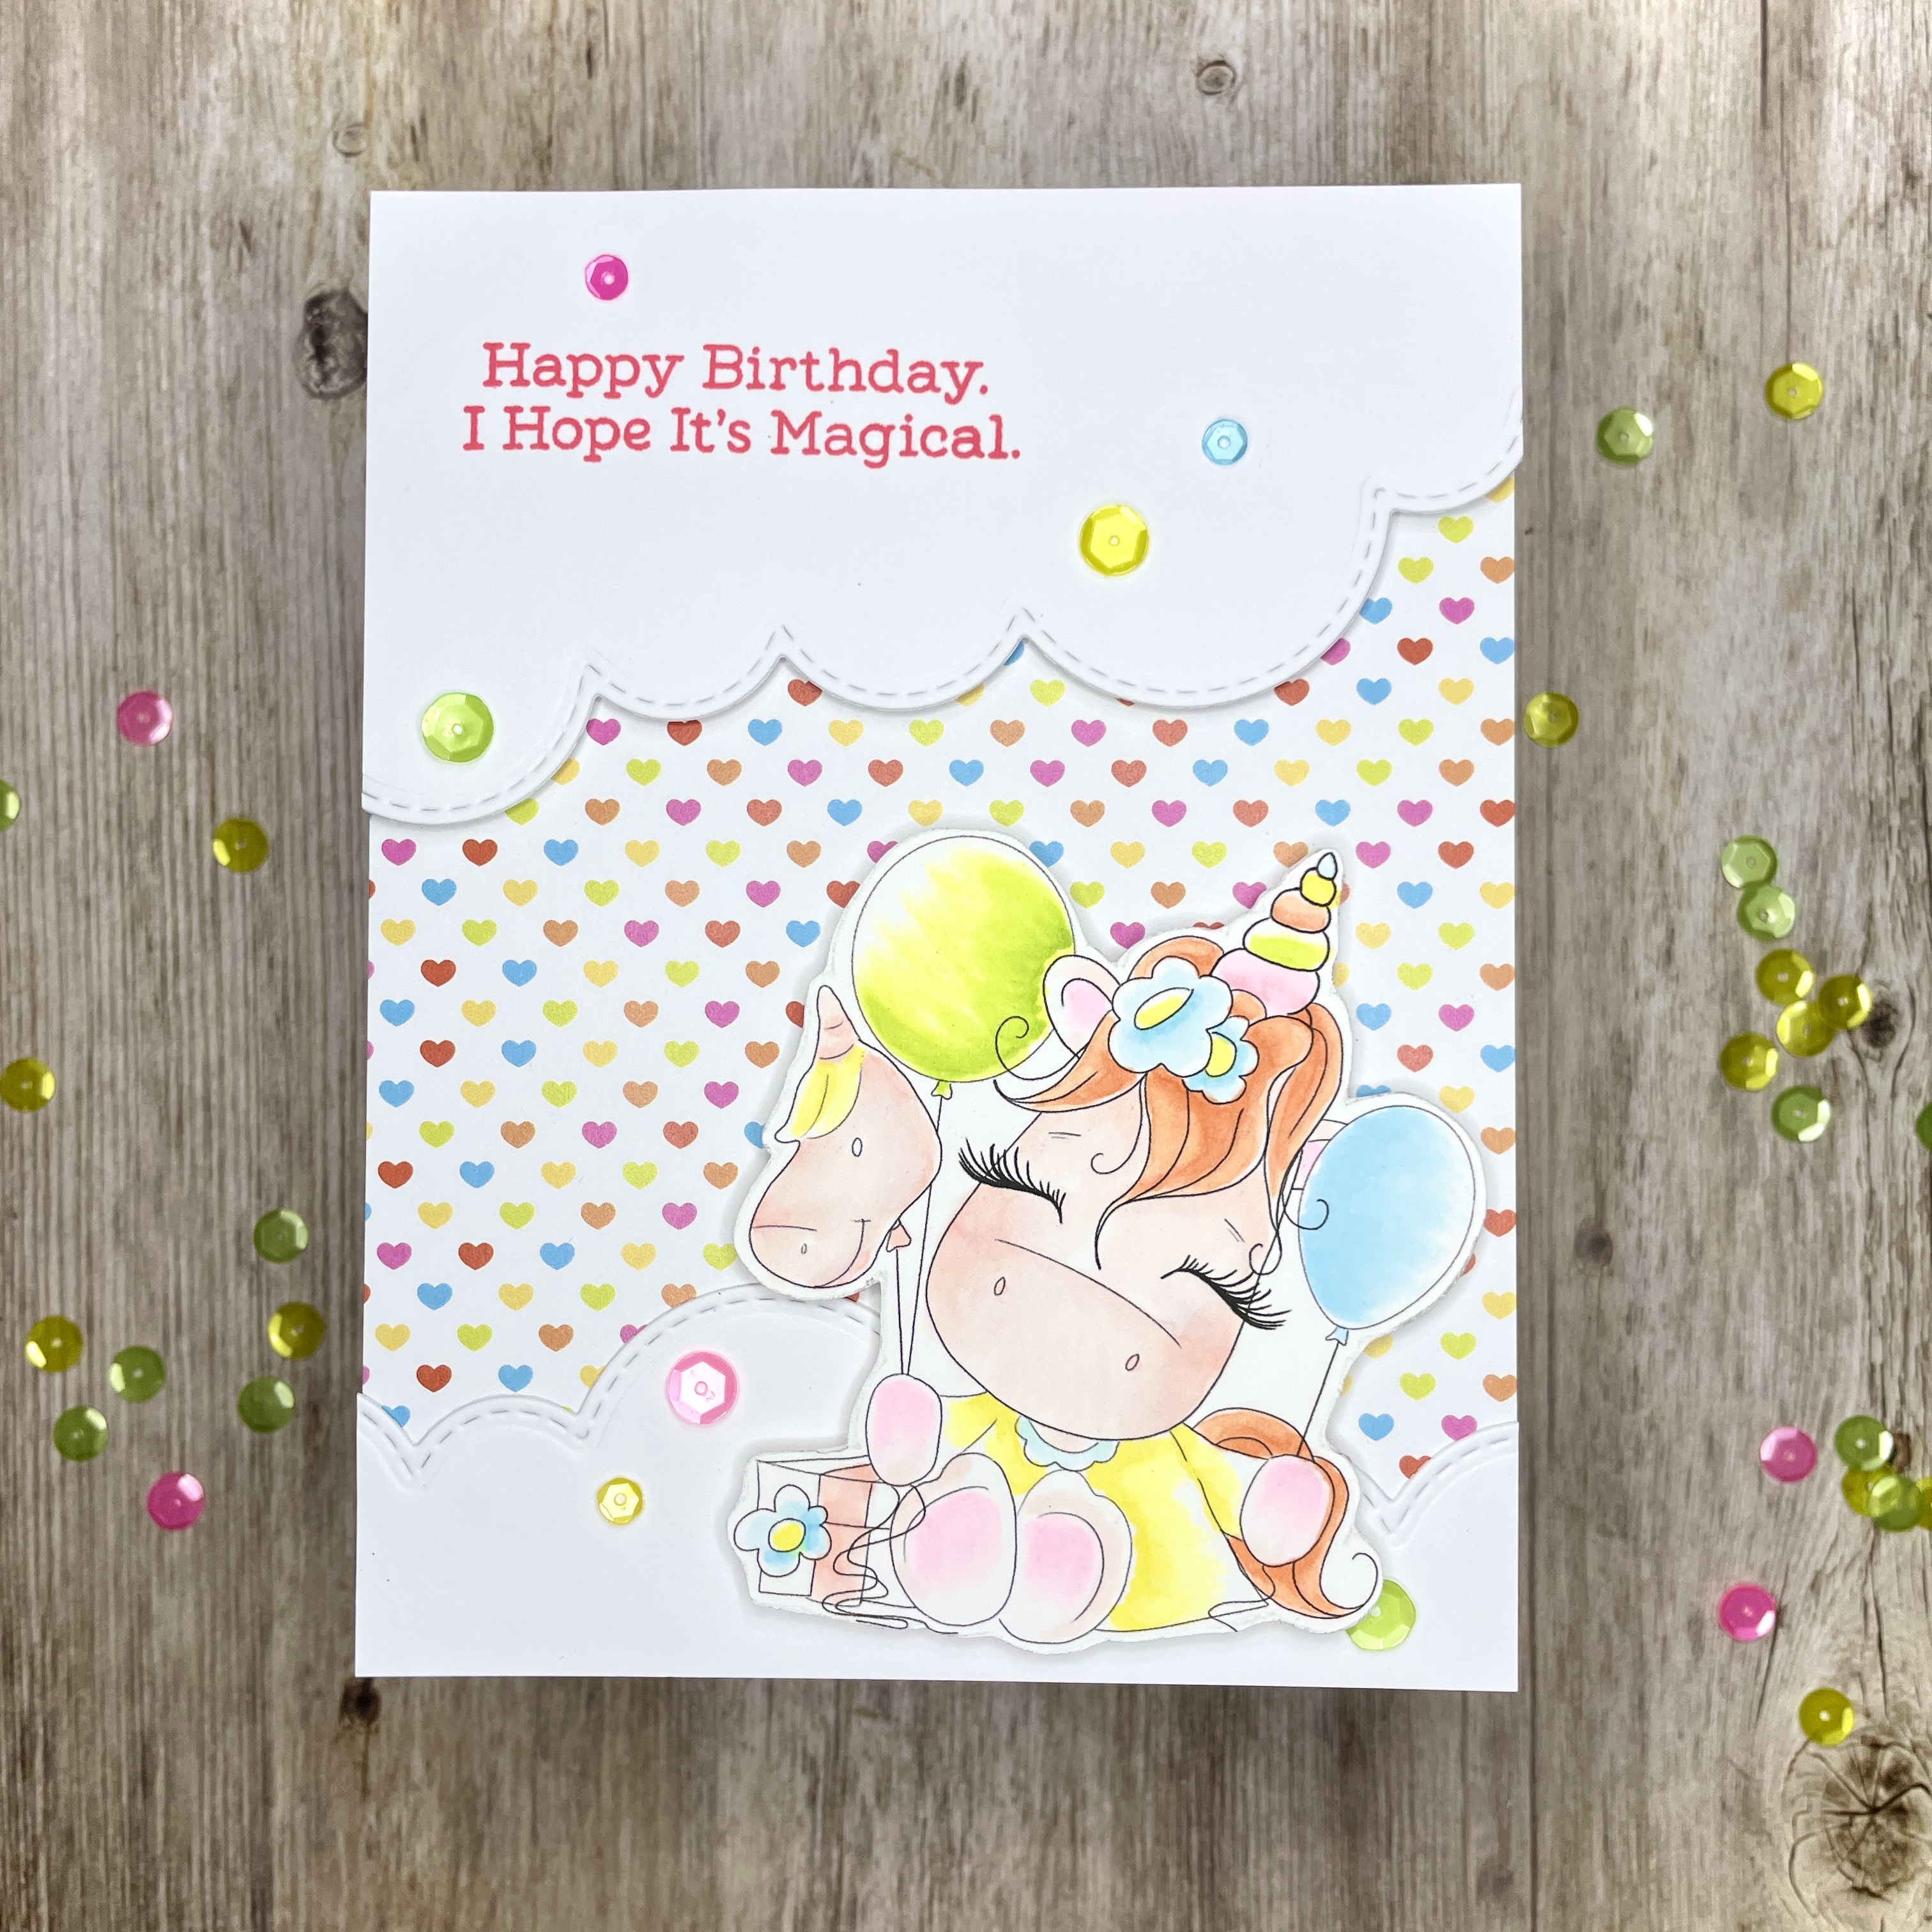
FEMININE
I used the same stamp mentioned above, with lighter shades of the colors chosen. However, I added a floral. I selected Altenew Fairy Tale Florals as the crosshatch layering stamp, which displays a geometric design. This assisted in coordinating the appearance between sets.
To achieve a perfect alignment, I used my ruler and stamping wheel to apply a pencil mark across the bottom of the panel. I then stamped the floral image onto a separate panel and colored it with the crosshatched layering stamp (All About Layering 3 Course) to continue the geometric style. I cut it out using the matching dies and adhered it to the panel with foam strips. I used Versafine Black Ink to stamp the sentiment onto the panel. I added a few iridescent sequins in a triangular pattern (Let it Shine Course).
Gift Set #2 - Easy Die Cutting Techniques
Thank You cards
Masculine - Negative Die Cutting
Feminine - Embossing with Dies
Masculine
I began my card by blending Distress Oxide Faded Jeans ink onto a panel of Neenah Solar White 110#. I started at the bottom and faded towards the top creating an ombre look, which was a lesson from the (Easy Ink Blending Techniques). I attached the leaf pattern die to it with washi tape to hold it in place. I then ran it through my Big Shot Plus machine and weeded out the positive pieces. I retained the negative portion as a backdrop. I repeated the steps mentioned above and created another ombre panel. I flipped the leaf pattern 90 degrees, resulting in an upside-down ombre behind my negative panel. I then glued the two together and attached it to a white card base.
I retrieved a panel of black glitter cardstock and proceeded to run the leaf die through my machine once more to obtain an additional set of positive pieces. I added confetti pieces to my card to give it some shine. Gold washi tape was added to the bottom half of the black cardstock to give my sentiment a different look. This technique was acquired through the All About Layering 4 course. I cut it twice for dimension, glued it together, and attached it to the panel with foam strips.
FEMININE
I used Neenah Solar White 110#, spritzed it with water to avoid any cracks, and then attached the Altenew Zero-Waste Leaf Pattern with washi tape. I ran it through my Big Shot Plus machine to create a full background. I then stamped my floral image using Altenew Peony Bouquet and colored it with the layering stamp with Altenew Fresh Dye Inks Blush, Rouge, Crimson, Velvet, Frayed Leaf, and Forest Glades. For the smaller floral image, I used Dew Drops and Aqualicious. I cut them using the matching dies. I adhered the leaves to the panel with glue and attached the florals with foam strips. I heat embossed the sentiment using gold embossing powder and added some gold embellishments for some extra shine.
Pro Tip: To emboss, you need to use a special mat and sandwich in your die-cutting machine.
Gift Set #3 - Seasonal Scene Building
Encouragement cards
Masculine - Masking Technique. Created background ink blending with a stencil and used a frame. Simple design. mix & matching sets.
Feminine - Background is built with ink blending, die cuts, and foam adhesive for dimension, mix & matching sets.
MASCULINE
For this card I used Altenew Exotic Parrot, the fence is an old set from Stampin' Up! I stamped the images onto a panel. I then stamped the image again on a post-it note and began masking my scene, fussy cutting the image, and placing it over the stamped images in order to create my background sky. I placed the cloud stencil on top and began to blend some blue skies with Dew Drops. I used Copic markers to color the parrot and added some neutral colors to the fence. I created the window scene by using a stitched circle die and then die-cut black cardstock with a stitched circle frame. I took some textured cardstock, placed my circle image on it, and traced around it with a pencil to cut the area correctly. I adhered everything together to the card base and added black embellishments to finish the card.
Pro Tip: To prevent gaps between stamped images, cut slightly inside or along the line of the masked fussy cut image.
FEMININE
I began by stamping my image from
Altenew Mushrooms Greetings, cutting it with the corresponding dies, and then coloring it with Copic markers. I then cut a small circle and placed it on a panel with some removable adhesive to create a moon, and I began ink blending my background scene with colors related to my color scheme to create an early wintry scene. I adhered some bare trees directly to the panel with glue. I then stamped the mushrooms, colored them with Copic markers, and then die-cut them with the matching dies.
My scene felt incomplete, so to add some movement, I added a deer from a Christmas set I have, colored it in a soft brown, and cut it out with the coordinating dies. I then took another white panel out, die-cut two stitched frames, and glued them together for dimension. I then positioned the images in place and attached everything with glue, except for the mushrooms, which were popped up on foam strips for added dimension. I stamped the sentiment with black ink and cut it out with the matching die from the same set. I completed the card with a few iridescent sequins.
Gift Set #4 - Celebration: Stencil Techniques
Happy Greetings cards
Masculine - Stencil Overlay
Feminine - Stamping with Stencils
MASCULINE
I began by preparing my craft area with a cup of clean water, a water brush, and a Canson XL watercolor paper. I applied some Altenew Navy and Evergreen Fresh Dye Inks onto my craft sheet. I applied water to the entire panel and proceeded to dip my brush into each ink until I was satisfied with the outcome. I heat set it, but you could let it dry on its own if you wanted. I then placed the Altenew Narrow Brick stencil onto the panel and secured it with washi tape. Using my blending tools, I began inking with the inks mentioned above the stencil in a circular motion. I removed the stencil and found a beautiful design that matched the other cards in the set. FEMININE
I used a craft sheet for this technique, since it can be a little messy. I began by dabbing my ink over the Altenew Narrow Brick stencil in no particular order. I used Blush, Rouge, and Dew Drops. I carefully flipped the stencil over and generously spritzed it with water. I positioned the stencil onto my panel and pressed my towel all over to ensure that the ink was transferring to my panel. I removed the stencil, resulting in a stunning design. This is one of my favorite techniques that I have learned throughout this course.
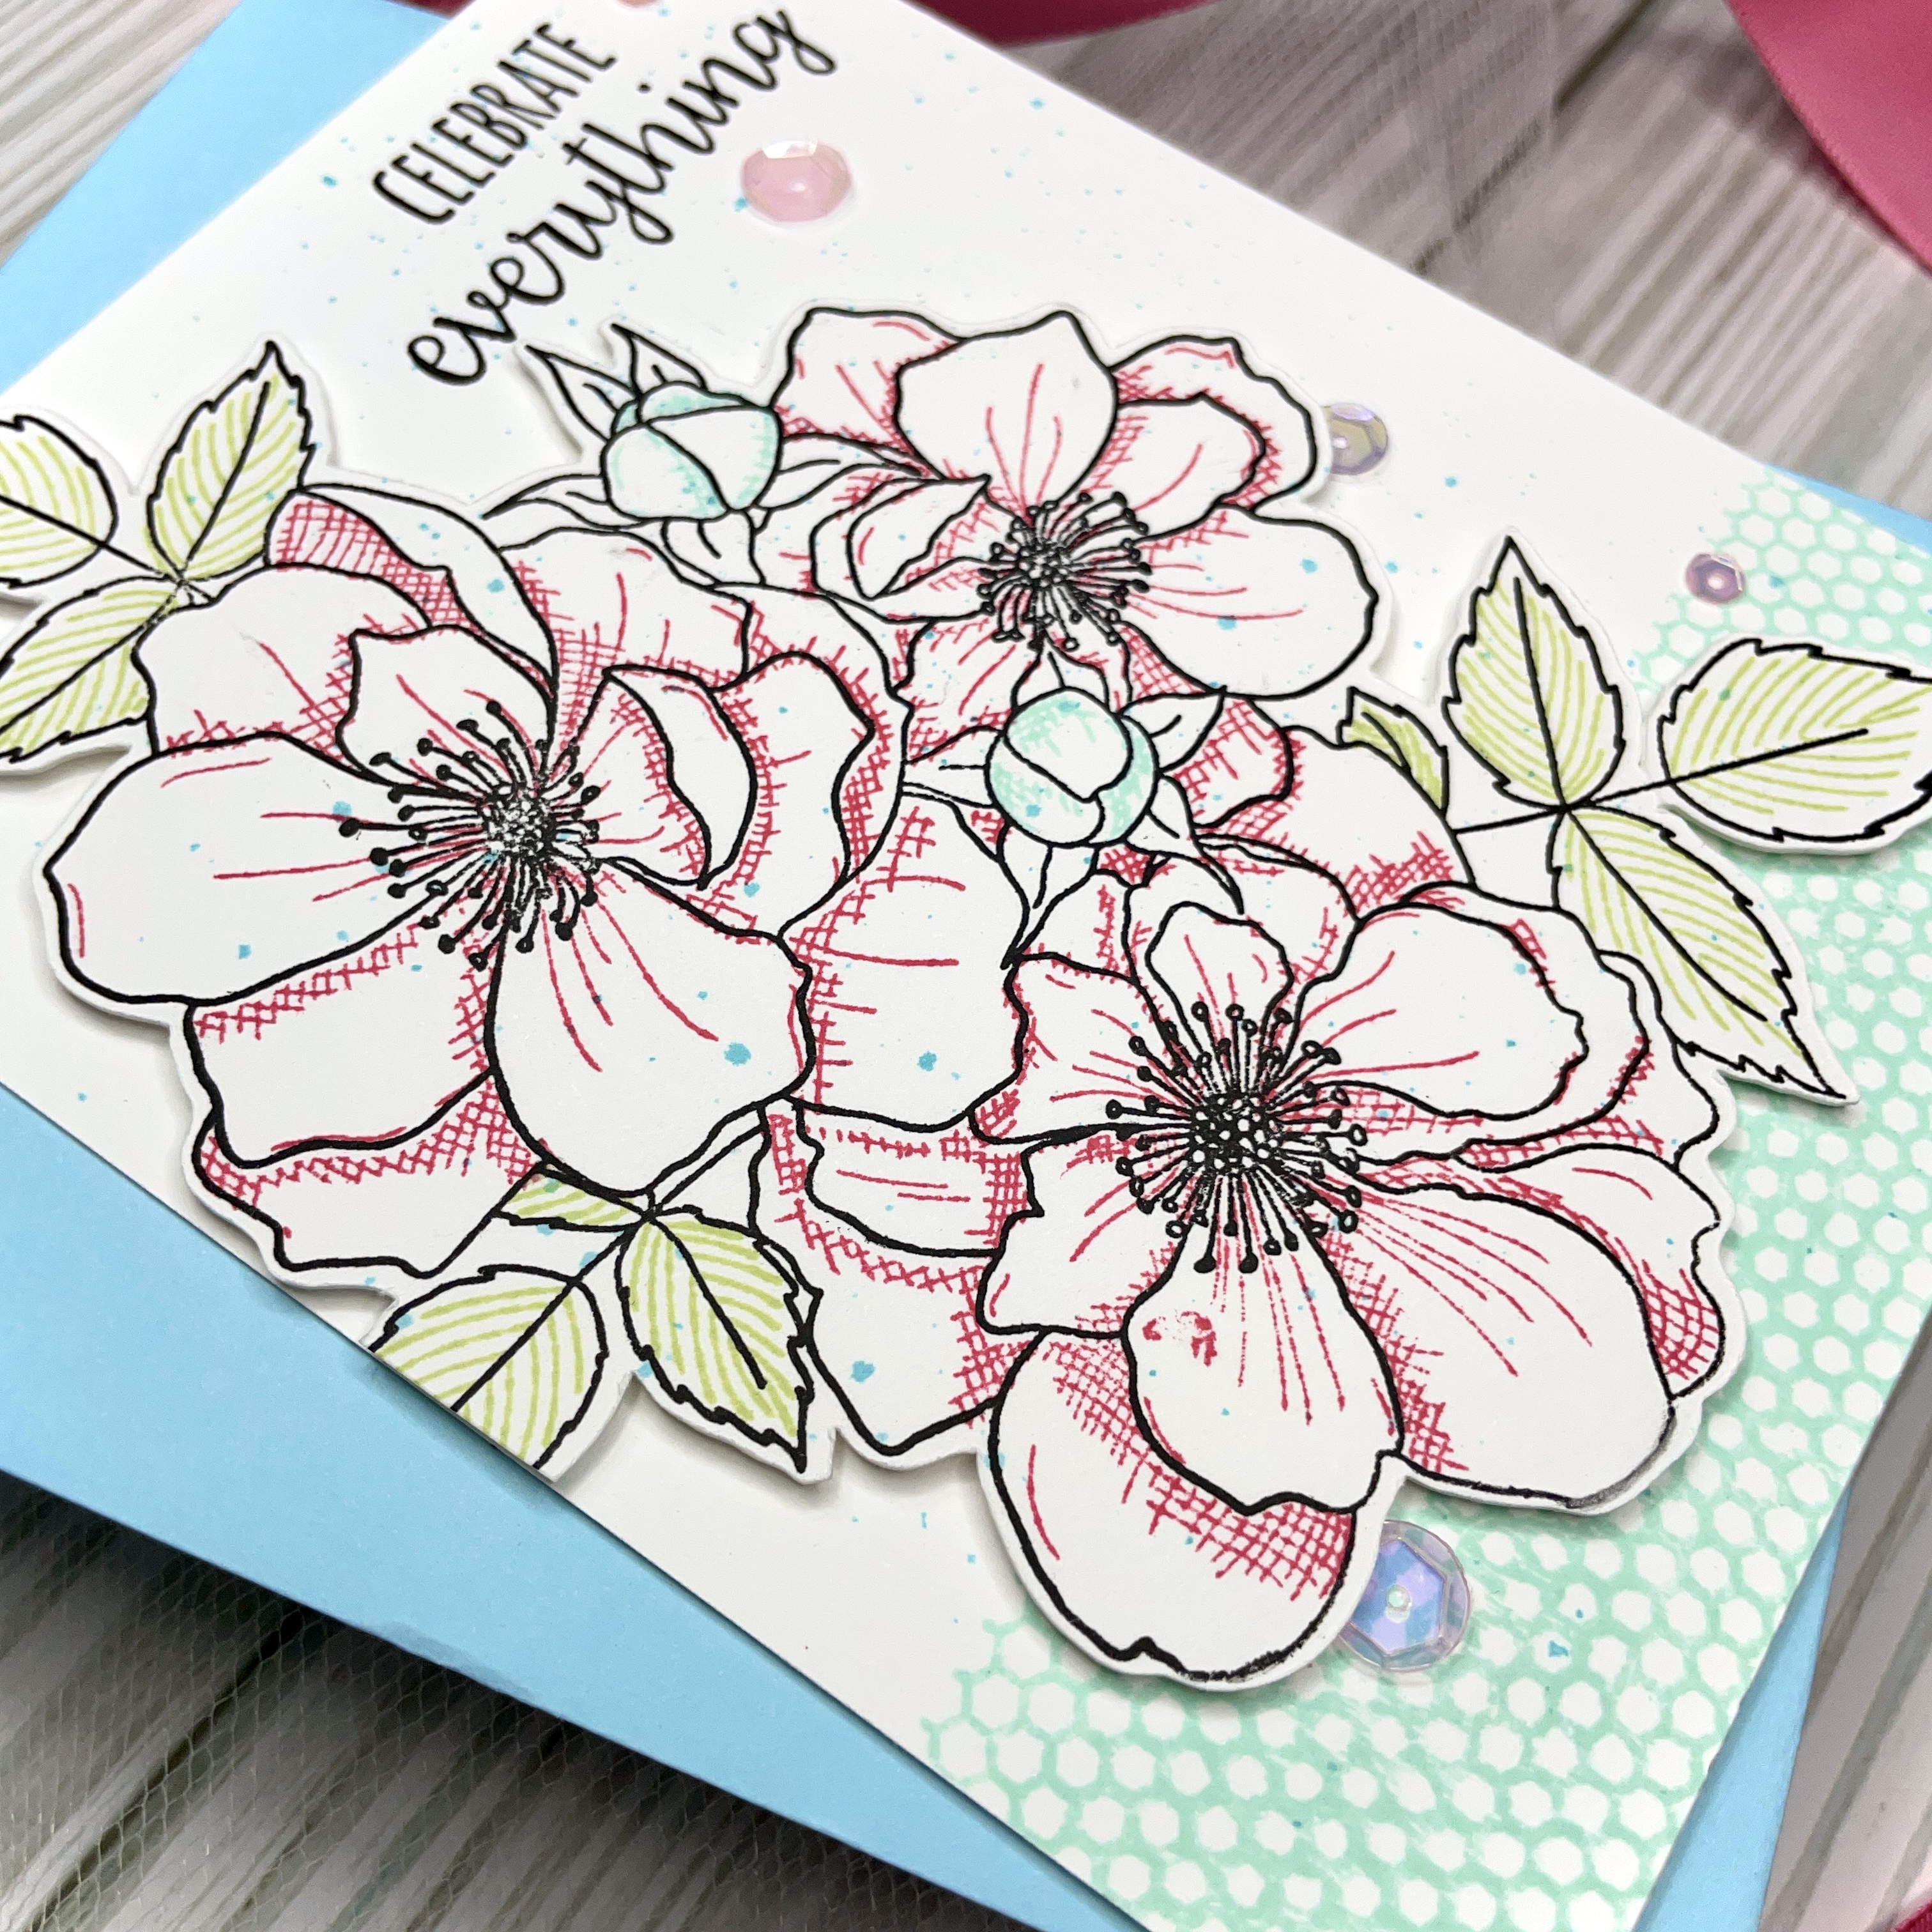
Next, I used acrylic blocks to stamp the Altenew Marbled Bloom floral and leaf images. After taking the All About Layering courses, I am now able to use my blocks more easily. I stamped all the layers with Altenew Red Sunset and Green Fields Fresh Dye Inks. The matching dies were used to cut everything out. In order to maintain consistency between the sets, I have decided to include a moth on this card using the same set mentioned in the masculine card. I stamped the image with Versamark ink on vellum, then heat embossed it with white embossing powder. I fussy cut it out and colored the backside with Copic markers.
I adhered the florals and moth with foam strips, then attached the leaves with glue. I then adhered the leaves to a white card base. The sentiment was heat embossed and cut twice for dimension before being glued directly to the panel. I also added iridescent sequins to complete the card.
Pro Tip: When watercoloring through a stencil, be sure to dab or pounce with your brush. This helps to keep the design of the stencil intact.
His & Her Gift Box Sets
The final part of the challenge involves the creation of His & Her gift box sets using a recycled item. This task proved to be challenging, as my spouse is meticulous in disposing of all items. I searched every room, moving things around, trying to find something, but I came up empty-handed. After allowing myself some time to think, I realized that I had finished the last of the Canson XL watercolor pad. As there was only enough to create one bottom, I grabbed my other watercolor pad and removed the cover to create two bottoms for my gift sets.
I have now added two bottoms to my gift box, but I needed the tops. I searched through my pattern paper stash and found a matching print that would work with my color scheme. I then created two box lids for my gift boxes. After that, I cut two tags on white cardstock with gift tag dies. I wanted to add something to the front of the box sets, so I decided to cut two gift tags from a set from My Favorite Things. For the masculine tag, I used the leaf outline from the Altenew Beautiful Day set and stamped it twice with navy ink, followed by the sentiment. For the feminine card, I stamped Altenew Vintage Roses with Frayed Leaf. The sentiment is from My Favorite Things. I wrapped the boxes in matching colored twine and attached the tags.
I have added the measurements below for an A2-sized gift box that can hold 6-8 cards with envelopes.
A2 Card Gift Box Measurements:
Box Base: 8 1/2 x 9 7/8 and score at 1" and 2" on all sides
Box Lid: 7 1/16 x 8 7/16 and score at 5/8 and 1 1/4 on all sides.
Template included below.