DISCLOSURE:

Several affiliate links are used in my posts. This means that, if you click on one of my links and make a purchase from that company, I will receive a small percentage of the sale without any additional charge. I appreciate your support greatly.

Monday, December 23, 2024

Merry Christmas

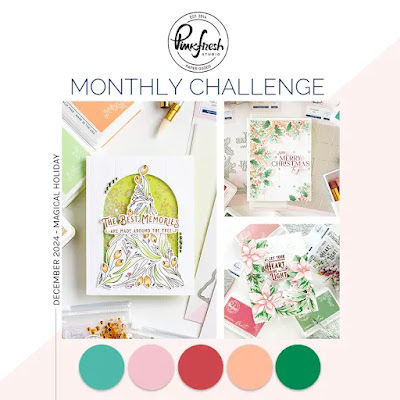
I’m back with another card inspired by the Pinkfresh Studio December Challenge! I’m completely in love with the color palette, so I just had to create another card using my new holiday bundle—it’s been such a fun set to work with!

For my card, I incorporated both the holiday theme and the color palette from the challenge, featuring Pinkfresh Studio Holiday Streets Press Plate and Holiday Streets Stencil.


I placed the press plate onto the Spellbinders BetterPress Letterpress System and ran it through my die-cutting machine. Next, I colored the design using the coordinating stencils, keeping it cohesive with the challenge theme. I added some extra shading to the snow using a Prismacolor pencil to enhance the depth and dimension of the scene.


For the sentiment, I used Simon Says Stamp Clean Line Christmas and mounted it on foam tape for added dimension.


Thanks so much for stopping by! Wishing you a day filled with creativity and joy! Be sure to follow me on Instagram @crafticarri for even more inspiration and crafty ideas!

CHALLENGES:
ABC Christmas Challenge - Y is for Favorite Colors *pink/blue combo
Double D - Christmas trees
Allsorts - #812-813
Crazy Stencil Fun - December *Winter/Christmas
Classic Design - #12-2024


Sunday, December 22, 2024

Sending Love & Thanks

Today, I’m excited to share a card inspired by the Pinkfresh Studio December Challenge. I had so much fun creating this design, and I can’t wait to show you how it turned out!

My card features the Farm Fresh StampDies and Stencil sets from Pinkfresh Studio, and I have to say, it’s quickly become one of my favorites! I just love the versatility and charm of this set.


I started by stamping the floral image and then used the coordinating stencil to add color, incorporating a few of the challenge colors for a vibrant touch. Afterward, I carefully cut out the image using the coordinating die. Next, I die-cut one of the two vases included in the set from a panel of green cardstock, which added a lovely contrast and a pop of color to complement the flowers.


Next, I took an A2 white panel and ran it through my die-cutting machine using Pinkfresh Studio's Blanket Stitched Rectangle Die. This added a beautiful stitched detail around the edges, giving the panel a polished, finished look.

I assembled all of the elements onto the panel using liquid adhesive and foam tape for added dimension. The sentiment was stamped in black ink, then cut out with the coordinating die and adhered to the vase. To finish the card, I added a few gold sequins for a touch of sparkle and elegance.


Thanks so much for stopping by! Wishing you a day filled with creativity and joy! Be sure to follow me on Instagram @crafticarri for even more inspiration and crafty ideas!

CHALLENGES:
SSS Wednesday Challenge - Use Craft Dies
Allsorts - #812-813
The Paper Shelter - Christmas Break Challenge


Saturday, December 21, 2024

Happy Holidays

Hi friends! Only 5 days until Christmas, so here’s another last-minute Christmas card featuring this adorable little squeaker from Lili of the Valley - Christmouse Holly!


I created a clean and simple card by stamping and then coloring the image with Copic Markers. After cutting it out with the Pinkfresh Studio Blanket Stitched Rectangle Die, I selected some colorful paper that coordinated with my image. I assembled the pieces together and adhered everything to an A2 white card base.


Thanks so much for stopping by! Wishing you a wonderful Christmas filled with joy and special moments with your family.

CHALLENGES:
Park Hopping My Happy Place - Cinderella's Mice
Classic Design - #12-2024
Aud Sentiments -#320 *non-traditional colors/Winter + Sentiment


Friday, December 20, 2024

We Wish You a Merry Christmas

Hi friends! Only 5 days until Christmas, so here’s another last-minute Christmas card to help spread some holiday cheer! 

I was inspired by the Stay Crafty with a Blog Named Hero December Challenge to create this clean and simple one-layer card featuring From the Vault Home Scene — an oldie but goodie!


I began by stamping the images on Neenah 80# cardstock and coloring them with Prismacolor pencils, creating a warm scene. I then cut the image out using The Rabbit Hole Designs - You've Been Framed Layering Die and adhered it to a red mat with liquid adhesive. 

Next, I stamped the sentiment directly onto the panel using black ink. I then cut another panel using the PhotoPlay Nested Stitched Scallops Die, assembled the layers, and adhered it all to a red card base.

Thanks so much for stopping by! I hope you have a wonderful Christmas surrounded by loved ones.


CHALLENGES:
Stay Crafty with a Blog Named Hero - Deck the Halls, December 2024
ABC Christmas Challenge - Y is for Favorite Colors - Red & Gray combo
Park Hopping My Happy Place - The Secret Lives of Pets
Allsorts - #812
Classic Design - #12-2024


DISCLOSURE: THIS POST CONTAINS AFFILIATE LINKS, MEANING I GET A SMALL COMMISSION WHEN A PURCHASE IS MADE THROUGH THAT LINK AT NO ADDITIONAL COST TO YOU. THANK YOU FOR SUPPORTING ME SO THAT I MAY CONTINUE TO SHARE MY CREATIONS WITH YOU!


Monday, December 16, 2024

A Bear-y Happy Christmas To You

Today, I’m excited to share this adorable Christmas card featuring one of the sweet images from the new Christmas set by Lili of the Valley!

This was such a fun image to work with! The original design is a film strip layout, but I chose to cut the images individually to create this playful and unique design.


I colored the images using Prismacolor pencils and Gamsol to lightly shade and add depth, giving them a soft, textured look.


To create the slimline background, I used the Tim Holtz Multi Stripes Shifter Stencil and positioned it sideways onto my cardstock and added lines with a Copic marker for a clean, textured effect. 

I then cut the Slimline Scallop Die from LDRS Creative, assembled the pieces, and finished it off with some sparkling glitter snowflakes for a festive touch.


Thank you for stopping by! Wishing you a Beary nice day!

CHALLENGES:
Stencil Fun - Christmas
Park Hopping My Happy Place - Country Bear Jamboree
Classic Design - #12-2024
A Cut Above - December AG


Sunday, December 15, 2024

Holly Jolly Wishes

Hi friends. Carrianne here sharing more Christmas inspiration with the 1 Line Holly Stamp Set from The Rabbit Hole Designs.

I started with a white panel and stamped the image twice, one below the other. Next, I colored the image with alcohol markers. I then stamped the sentiment, using masking tape to break it up. 


I trimmed the panel to 4 x 5 1/4 and adhered it to a red mat, which was then attached to an A2 white card base. I finished the card by adding red sequins for that perfect festive touch.


Thanks for stopping by! I hope your day is as Holly as can be!


DISCLOSURE: THIS POST CONTAINS AFFILIATE LINKS, MEANING I GET A SMALL COMMISSION WHEN A PURCHASE IS MADE THROUGH THAT LINK AT NO ADDITIONAL COST TO YOU. THANK YOU FOR SUPPORTING ME SO THAT I MAY CONTINUE TO SHARE MY CREATIONS WITH YOU!


Twas the Night before Christmas

There’s a brand new Christmas release over at @lotvstamps! And guess what? If you purchase this set for just £25, you’ll get an email link to download all 685 digital stamps worth £2000 – FOR ABSOLUTELY FREE as a special Christmas gift! How amazing is this?! 🎉

My card features one of the adorable digital images from the new set, and it was an absolute joy to work with! 

Don’t miss your chance to grab this amazing offer, available through December 25—hurry, time is ticking!

Be sure to visit https://liliofthevalley.co.uk for all the details!


I printed the image and colored it with Copic Markers. Then, I stamped the sentiment in black ink directly onto the panel. I used The Rabbit Hole Designs, You've Been Framed Layering Dies to cut it out and adhered it to a red card base. To finish, I added red sequins for a touch of sparkle!

Thank you for stopping by! Have a fabulous day!

CHALLENGES:
Allsorts - #811
Classic Design - #12-2024


DISCLOSURE: THIS POST CONTAINS AFFILIATE LINKS, MEANING I GET A SMALL COMMISSION WHEN A PURCHASE IS MADE THROUGH THAT LINK AT NO ADDITIONAL COST TO YOU. THANK YOU FOR SUPPORTING ME SO THAT I MAY CONTINUE TO SHARE MY CREATIONS WITH YOU!


Miss You

Hi there, friends! We are back with a new challenge at Beautiful Blossoms Challenge and, as you know, it's Anything Floral Goes! An optional mood board is available for inspiration. I can't wait to see your creations! Happy Crafting!

I used the Altenew Sweet Flowers Stamp Set to create a simple, one-layer design.


I began by stamping the image from and then used the layering stamps to color it. I used Enchanted GardenSummer Afternoon and Forest Glades creating a balanced and harmonious color palette. 

To add subtle depth to the image, I used the Monochrome Shading Pencils Set using 2H and gently applied shadows where I imagined the light would fall, creating a soft sense of dimension. To complete the card, I added some yellow gems for a pop of sparkle and to tie the design together.

Be sure to visit the blog for more inspiration from the talented design team! There’s always something new and creative to discover!

Thank you for stopping by! Have a wonderful day!

CHALLENGES:
Allsorts - #811


Saturday, December 14, 2024

Reindeer Shaker Fun

Hi friends! Carrianne here! I've got a fun reindeer shaker card to share with you today on the blog featuring The Rabbit Hole Designs 1 Line Reindeer Stamp Set.

I started with an A2 size white panel and stamped the image in the center. After coloring the image with alcohol markers, I added a winter scene behind it and added snow with a white gel pen.


Next, I layered another panel on top and used a stitched circle die in the center to create the shaker window. I adhered acetate to the back with liquid adhesive, then stamped the sentiment in black ink onto the panel. To add dimension, I used two layers of foam tape. I filled the shaker window with a mix of blue sequins and carefully placed the top panel over the image to seal it all together and complete the shaker effect.

For added sparkle, I added clear iridescent sequins to the front of the card.


Thanks for shaking up some time to visit! I hope you have a wonderful day.


DISCLOSURE: THIS POST CONTAINS AFFILIATE LINKS, MEANING I GET A SMALL COMMISSION WHEN A PURCHASE IS MADE THROUGH THAT LINK AT NO ADDITIONAL COST TO YOU. THANK YOU FOR SUPPORTING ME SO THAT I MAY CONTINUE TO SHARE MY CREATIONS WITH YOU!


Merry & Bright

My card was inspired by the Caroling Christmas Cards Instagram Hop. December's playlist is The Twelve Days of Christmas or Rudolph the Red-Nosed Reindeer.

As you can see from my card, I chose Rudolph the Red-Nosed Reindeer, and I used the Rudolph digital image from Polkadoodles.


I printed the image on Neenah Solar White #80 cardstock and colored it with Copic markers. Then, I cut it out using a stitched circle die.


The sentiment was heat embossed and also adhered with foam tape for extra dimension, and I placed red sequins to finish the card with a touch of sparkle. I also colored Rudolph's nose with Wink of Stella to guide him on his sleigh ride.


Thank you for stopping by! May your holidays shine as bright as Rudolph’s nose!

CHALLENGES:
Christmas BINGO (or not) - #10 *B Dots, Hand-colored, Free


Happy New Year

Today, I am sharing a new year card with the beautiful Champagne Celebration Colour digital image from Polkadoodles. I loved how easy and fun it was to make this, as it was my first time using a pre-coloured image.  

I began by printing the sentiment from the Happy New Year digital bundle onto a white panel and then die-cutting it with a scalloped frame. I then blended black and gold inks through a star stencil and adhered it to a black mat. Then, I attached it to a white card base.


Next, I resized the image, printed it, and fussy cut it out. I then added foam tape to the image for dimension. I topped the card off by adding gold stars for a touch of sparkle.


For more creative inspiration, be sure to follow me on Instagram @crafticarri

Thank you for stopping by! Have a wonderful day!

CHALLENGES:
Stencil Fun - December *Winter
Allsorts - #811
Crafty Calendar - December AG
Di's Digi Challenge - Winter Holidays
A Place to Start - December
Crafter's Cafe - Monochrome


Saturday, December 7, 2024

Hope Your Holidays are Sweet

Hello friends! I am excited to participate in the December Wacky and Obscure Holidays Instagram Hop.

My card features Picket Fence Studios' Candy Cane ChristmasIt is such a beautiful and festive image. For the background, I used Spellbinders In the Pines Embossing Folder.


I started by stamping the image and then coloring it with Copic markers. I then fussy cut it out.

I created the background by dry embossing an A2 panel of white cardstock with the In the Pines Embossing Folder from Spellbinders.

I added dimension by adhering the image to foam tape and finishing the card with red sequins.


I enjoy adding candy canes to my hot cocoa for that perfect minty kick! Have you tried it?


Are you interested in joining the fun? You can find all the details on my Instagram account @crafticarri, and reach out to Melissa to find out how you can join next month.

Thanks so much for stopping by! Wishing you a magical and joyful holiday season!


CHALLENGES:
Allsorts - #810
Crafty Calendar - December AG
Di's Digi Challenge - Winter Holidays
A Cut Above - December
Passion for Markers - #769 Mega Christmas Challenge


Friday, December 6, 2024

I Love You

Hi friends! Today, I’m sharing a Valentine’s Day card as I take a break from all the Christmas crafting. This card features the Lili of the Valley - James Big Heart digital image, which is just perfect for spreading some love!


I decided to keep this card clean and simple to let this adorable bear take center stage. By focusing solely on the James Big Heart image, I wanted to highlight its sweetness and create a card that feels both charming and heartfelt.


I started by arranging the James Big Heart image and sentiment on my computer before printing it out. Once printed, I trimmed it to a 4" x 5 1/2" panel size. I then colored the image using Copic Markers to bring the adorable bear to life. After that, I sorted through my Valentine's paper stash, trimmed a piece to 4 1/8" x 5 3/8", and adhered it to an A2 white card base. Finally, I added the top panel and finished the card with a few red sequins for a touch of sparkle.


Products used:


Thanks for stopping by! I hope you have a wonderful day!


CHALLENGES:
Park Hopping My Happy Place - Country Bear Jamboree
Crafts Galore - #130 AG
Di's Digi Challenge - Winter Holidays