A Huge Thank You to All My Participants!
First and foremost, I want to extend a HUGE thank you to Rick, Jennifer, Suzanne, Disha, Ishani, Nandini, Susan, Lisa, Angelique, Liz, Jerralyn and Irene who joined me for my live workshop! Your enthusiasm and excitement truly made the experience unforgettable. I’m beyond grateful for your participation and support—it truly means the world to me.
Your participation truly put me at ease, and I was able to fully enjoy the experience knowing I had such an amazing group of people alongside me. Thank you for making this workshop such a success, for inspiring me with your enthusiasm, and for helping me feel confident in sharing what I love. I can’t wait for more opportunities to create, learn, and grow together!
I would especially like to thank Erum for her unwavering guidance and support throughout my AECP journey. Her mentorship, encouragement, and invaluable advice have been a constant source of inspiration. Thank you, Erum!
What I Gained from My Creative Journey
I started this journey in March 2024 with a simple goal: to improve my crafting skills and challenge myself to grow as an artist. At the time, I wasn’t sure exactly how much I could achieve or what I might discover along the way. But as January 2024 approached, I realized that I had received so much more than I ever anticipated.
What began as a desire to better my craft turned into a transformative experience—one that not only honed my technical abilities but also deepened my creative confidence. Through countless hours of learning, experimenting, and pushing myself beyond my comfort zone, I was able to connect with a vibrant community of fellow crafters, learn from some of the best in the industry, and grow in ways I never thought possible.
The journey has been about more than just mastering techniques—it’s been about rediscovering my passion for crafting, finding new ways to express myself through my work, and learning how to share that joy with others. The growth I’ve experienced this past year has shaped me as an artist, and I’m beyond grateful for every step along the way.
What is the Altenew Educator Certification Program?
The Altenew Educator Certification Program (AECP) is a comprehensive course designed to help crafters improve their skills and learn how to teach others. It includes a series of online classes focused on various techniques like stamping, coloring, layering, and stenciling. As participants complete assignments, they not only refine their own crafting abilities but also learn how to share their knowledge with others.
Reflecting on My Live Workshop: A Journey of Creativity and Connection
Last Saturday, I had the absolute pleasure of hosting my final challenge which was to host a 2 hour live workshop on stenciling techniques, and I’m still buzzing with excitement from how well it went! In this post, I want to walk you through the preparation steps, share a bit about the anticipation from the participants, and reflect on what I learned during this experience.
The lesson centered around the endless possibilities of stenciling, showing how versatile and fun it can be when combined with stamping and embossing paste. Participants were able to see firsthand how these techniques could transform a simple design into something truly special. It reinforced just how much creativity and magic can come from using basic tools, and how the right combination of techniques can make a card truly come alive.
Preparation: Initially, I had planned for an in-person event and had put together a detailed lesson with instructions for my workshop, which I shared with Erum. After discussing it with her, we decided to pivot to a live online workshop. This change required a few adjustments, but I was able to keep the core of my original plan intact. The best part? It allowed me to reach a wider audience, so the techniques I was eager to share could be enjoyed by participants no matter where they were. I sent out the invite, and to my delight, 13 amazing crafters were excited to join within a few hours.
Navigating the Technical Side: I practiced with both Google Meet and Zoom to find the best platform for the workshop. After encountering a few issues with Google Meet, I decided to go with Zoom. The setup was seamless, and sending out the link to participants was a breeze. Zoom's user-friendly interface made it easy to share my screen, interact with the group, and ensure everything ran smoothly during the session. It truly was the right choice for making the workshop both enjoyable and easy to follow for everyone involved.
From Nerves to Excitement: As the day of the workshop approached, I’ll admit—I was a nervous wreck! Before the workshop kicked off, I had a chance to chat with Erum, and she immediately put me at ease. Her support really made a difference. When the session began and I saw everyone engaged and excited, it felt like everything clicked into place. It was just a group of crafters, enjoying the day and creating together. The participants were so enthusiastic, asking great questions, sharing feedback, and diving right into the techniques. Watching them embrace stenciling and bring their creative visions to life was truly fulfilling. By the end of the session, it was clear: everyone had something beautiful to show for it!
Card #1 - Stamping with a Stencil
For the first card, we applied the Stamping with a Stencil technique using the Flowing Drops Stencil. I used Deco Garden Fresh Dye Ink - Coral and Mid Yellow inks for a soft, vibrant look. We started by dabbing the stencil with ink, then spritzed it with water. After flipping the stencil, we carefully placed it onto watercolor cardstock and gently pressed down to transfer the ink. The water helped the ink blend and spread, resulting in a smooth, watercolor-like effect.
Additional products used:
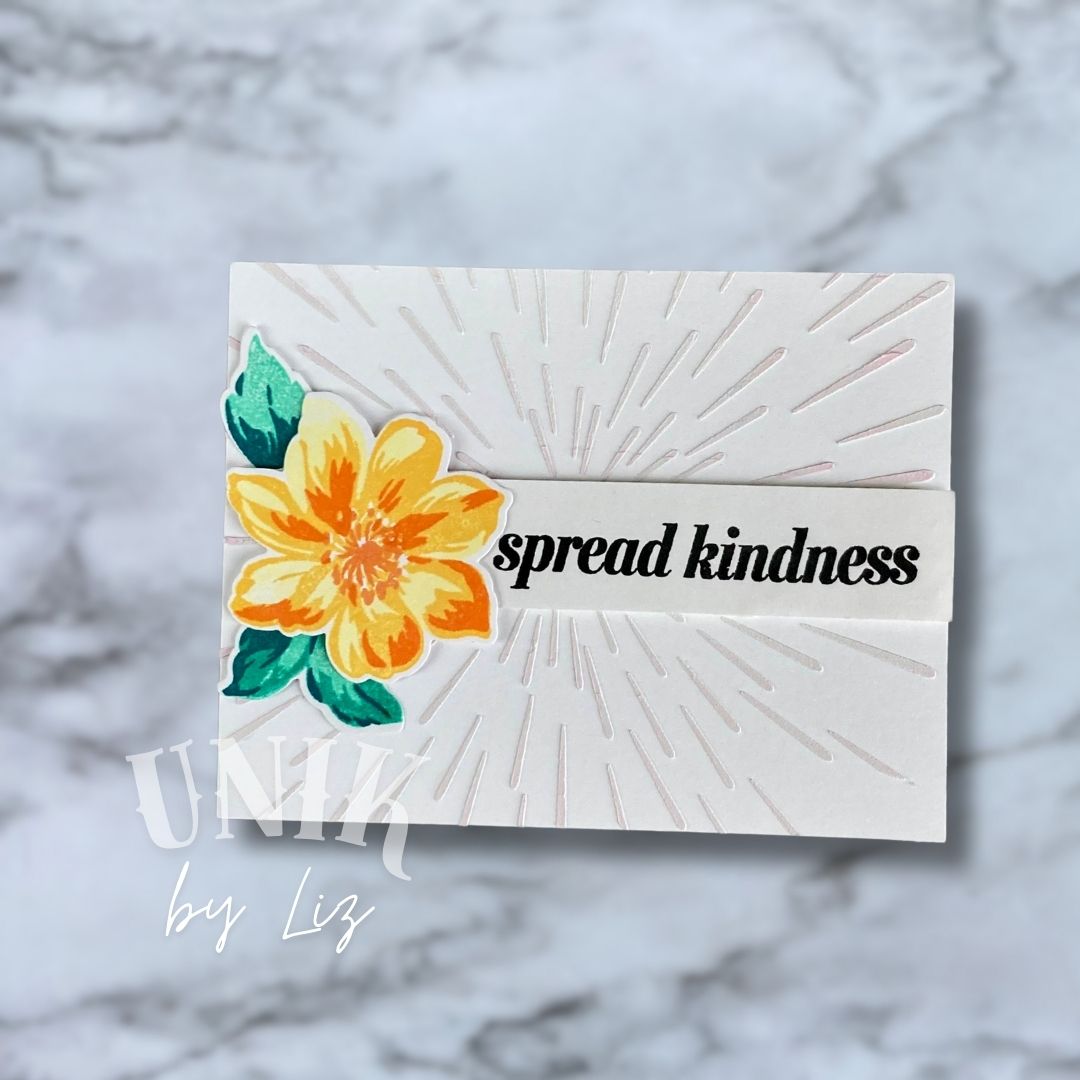
Participants cards:
Card #2 - Stencils & Embossing Paste
For the second card, we focused on creating a colorful, textured, and dimensional background using stencils and embossing paste. My card features the Altenew Square Weave Pattern Stencil, paired with Aqualicious ink from the Sweet Dreams Fresh Dye Inks, and Embossing Paste. As with the first card, participants used their own supplies, which made the results even more unique. This technique is perfect for adding depth and interest to your cards while keeping the design simple yet effective. The embossing paste gave the background such a rich, tactile feel, and the vibrant ink added just the right amount of color to make the texture pop!
Additional products used:
How the Workshop Went: The workshop itself was amazing! From the first demo to the final project, everything flowed seamlessly. But what truly made it special was the level of participation. It was so inspiring to see all the gorgeous cards being created, and the sense of community was incredible. It wasn’t just about mastering a technique—it was about sharing creativity, learning from each other, and supporting one another throughout the process. I even picked up a few new tricks from some of the participants along the way!
I’m in awe of all the beautiful creations from my live workshop! I love that some participants went above and beyond, creating even more than requested—it really shows how much they enjoyed the techniques. I couldn’t be happier with how everyone embraced the techniques, added their own creative flair, and produced stunning cards. It was so hard to choose which ones to post, so I ended up sharing them all! Watching everyone’s ideas come to life was so rewarding, and it truly reinforced how crafting is about self-expression and community. Thank you to everyone who joined in and made this experience unforgettable!
What I Learned: Hosting a live workshop is always a learning experience, and I took away so much from the session. First, I learned how important it is to really listen to participants and respond to their needs in real-time. Whether it was providing extra tips or slowing down to explain a step more thoroughly, the interaction made the workshop feel personal and meaningful.
I also realized how much I value the sense of community that crafting brings. It’s not just about making cards; it’s about creating connections, sharing experiences, and inspiring one another. I can’t tell you how many times I smiled while watching people experiment with different colors, textures, and techniques.
Conclusion: All in all, I feel that my live workshop was an incredible success, and I couldn’t have asked for a better group of crafters to share this experience with. From the moment we started, the enthusiasm and engagement truly made the session come to life. The creativity, energy, and willingness to try new techniques made the workshop not just a learning experience, but a fun and inspiring event. I’m so grateful for each of you and how you made it such a positive and rewarding experience. The sense of community and collaboration was truly special.
I can’t wait to continue this journey with you all!