DISCLOSURE:

Several affiliate links are used in my posts. This means that, if you click on one of my links and make a purchase from that company, I will receive a small percentage of the sale without any additional charge. I appreciate your support greatly.

Monday, March 31, 2025

Happy 4th of July

Hey friends! Today, I’m sharing a card featuring the new release Sentimentally Speaking Holidays Stamps and Dies from The Rabbit Hole Designs. It's packed with so many amazing holiday sentiments that will make your crafting so much easier!

And here’s a little extra treat—when you spend $45 or more (before taxes and shipping), you can snag the Enamel Dot Bundle for FREE! Just add it to your cart, and the discount will apply at checkout.


I used the stamping with a stencil technique for the background by adding blue and red inks onto the Candy Twist Stencil, then spritzed it with water to create a fun watercolor effect. I cut the panel using the You’ve Been Framed Layering Die, then layered it onto blue and red mats before adhering it to a white card base. 

I stamped the sentiment in red ink, swiped blue ink on the bottom for an ombre look, and used the coordinating die to cut it out. After popping the sentiment up on foam tape, I finished the card with some colorful stars for that perfect Fourth of July sparkle!


Thank you so much for stopping by! Wishing you a wonderful day filled with creativity and joy!


Sunday, March 30, 2025

How Does Your Garden Grow?

Hey friends! I’m back with more inspiration featuring Artful Angel's Garden Gnomes and the sentiment is from the latest release Growing Garden! This time, I’ve had fun using some of the smaller elements from the set to create a playful design. 


I started with white cardstock on my Altenew Stampwheel and used one of the stencils from La-La Land Crafts' Christmas Trees set, blending Distress Oxide Twisted Citron through it. I stamped the small elements from the Garden Gnomes set between the stencil openings, leaving them uncolored.

For the sentiment, I stamped and die-cut it from Artful Angel's Growing Garden set, layering it onto a green stitched circle. I adhered the sentiment to the panel with foam tape and attached the panel to a green card base.


Thank you so much for stopping by! 
Wishing you a wonderful day filled with creativity and joy!


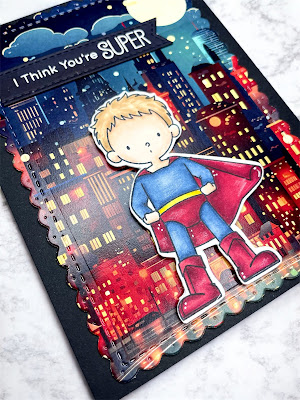
I Think You're Super

Hi friends! Today I'm joining in on the My Favorite Things Instagram hop where we pick a favorite theme each week and create a card. This week’s theme is Favorite Movies, and I couldn't be more excited to share my take on it! 

My card features My Favorite Things Superboy and La-La Land Crafts Winter Time Paper Pack. 

My favorite movies are Marvel—gotta love superheroes! Superman’s always been my top pick for his strength, selflessness, and commitment to truth. Christopher Reeve was iconic, but I also love how Henry Cavill brought a modern, serious edge to the role. How about you? Do you have a favorite Superman? 


I stamped the Superboy image, colored him using Copic Markers, and used my Scan N Cut machine to cut him out. I searched through my paper stash and found the perfect nighttime scene with buildings in the background from La-La Land Crafts Winter Time Paper Pack. I cut it out using the Scalloped Rectangle die, also from La-La Land Crafts. I then adhered it to a black card base. To add dimension, I popped the Superboy image up on foam tape. 


For the sentiment, I heat embossed it onto black cardstock, cut it out with a stitched sentiment die, and adhered it directly to the panel using liquid adhesive, creating a clean and layered look.


Thank you so much for stopping by! Wishing you a wonderful day filled with creativity and joy!

CHALLENGES:
Park Hopping My Happy Place - Marvel Superhero Island


Saturday, March 29, 2025

Current Mood: Caffeinated & Feisty

Hello friends! Today I’m back with more inspiration using The Rabbit Hole Designs Caffeinated Critter Bundle set. This little bear is Out in the Woods feeling a bit feisty and craving that much-needed caffeine boost!


First, I stamped the image and colored him with alcohol markers, then used the matching die to carefully cut him out.

For the background, I blended blue and green inks, then used my birch tree forest die to cut out a woods scene from Kraft cardstock and adhered it to the panel for an earthy, woodland vibe.


After popping up the image with foam tape, I adhered the sentiment strips and finished everything off with a few embellishments.


Thank you so much for stopping by! Wishing you a wonderful day filled with creativity and joy!

CHALLENGES:
SSS Wednesday Challenge - AG


Friday, March 28, 2025

FREE Cardmaking Workshop

Welcome and thank you for signing up for my Mixed Media Workshop! I am so excited to have you join me today to explore the wonderful world of mixed media. 

Creating a Grungy, Bold Textured Background Using Fun Mediums and Alphabet Dies

Instructor: Carrianne Banul
Date: April 24th, 2025
Time: 6:00 PM (EST)
Platform: Zoom


Workshop Overview:

Welcome to this exciting workshop where we'll explore the world of mixed media and create a bold, grungy textured background for your cards. We’ll work with various fun mediums and alphabet dies to make our designs stand out with vibrant, distressed effects. You’ll learn how to layer different textures and mediums to create stunning backgrounds and how to incorporate alphabet dies to add an extra pop to your project!

Altenew Supplies:


Other Supplies:

Gel Medium REQUIRED
Gesso REQUIRED
White Heavy Cardstock
Watercolor Cardstock
Ivory Cardstock
Heat Tool
Cup with water
Wide Paintbrush 
Wet Cloth/Wipes
Spray box (for shimmer spray)
Foam Tape
Liquid Adhesive


I’d greatly appreciate it if you could use my Altenew Affiliate Link for your purchases SHOP HERE. It comes at no extra cost to you, but it helps support future workshops and my crafting journey. Thank you so much for your support! 

If you haven’t received the discount code after signing up for the workshop, please feel free to reach out to me, and I’ll be happy to provide it!

If you have any questions or would like to register for this class, don’t hesitate to reach out to me via email at carrianne23@gmail.com. I’m more than happy to assist you and will be here to guide you through every step of the process. 

Remember, no question is too small or silly — we’re all here to learn and grow together, and I want to make sure you're comfortable and ready for the class!


Thursday, March 27, 2025

Keep Palm and Carry On

Hi friends! I’m back with more inspiration featuring Lili of the Valley’s adorable new release, Safari Animals! This set is filled with the most charming little animals, making it a total joy to create with.


I started by coloring the images with Copic Markers and used my Scan N Cut machine to carefully cut them out. For the background, I took an A2 panel of white cardstock and used the Watercolor Wash Rectangle Stencil from My Favorite Things and blended Distress Oxide Twisted Citron ink, creating a soft, fresh wash of color. 

To add depth and texture, I used the Shadow of Leaves Stencil from Picket Fence Studios and layered it directly on top of the previous stencil—this technique is known as Stencil Stacking. I then blended Distress Oxide Mowed Lawn through it, creating a vibrant jungle backdrop that truly brings the scene to life.


I added some dimension by popping the image up with foam tape. The sentiment, which is from the coordinating set, was adhered directly to the panel with liquid adhesive. To complete the card, I mounted the panel onto a slightly larger green mat, then attached the whole piece to a white card base for a crisp, polished look.


I truly hope this project has inspired you and sparked some creative ideas! Thank you so much for stopping by—it means a lot!

CHALLENGES:
Stencil Fun - March AG
Park Hopping My Happy Place - Animal Kingdom Park
Di's Digi - Animals
The Neglected Stuff - MFT Watercolor Wash Stencil


Saturday, March 22, 2025

Happy Mother's Day!

Hello everyone! Today, I’m excited to share a beautiful floral card featuring the Perfect Peony digital image. Our theme this week was Mother’s Day, and since my mom absolutely loves peonies, this card will definitely bring a smile to her face! I paired the image with the lovely Mother’s Day digital sentiments to complete the design.


I printed the Perfect Peony image twice — once on cardstock and once on regular copy paper to create a mask. After placing the mask on top of the image, I splattered some black ink over it to add a touch of texture and contrast.

I added color to the image using my Prismacolor pencils to bring out the beautiful details of the peony, blending the colors for a soft, rich finish. Then, I adhered the colored image to a white A2 card base to complete the card.

Prismacolor pencils: 
Pink: PC929-PC994
Green: PC913-PC909

Thank you so much for stopping by! Wishing you a wonderful day filled with creativity and joy!


May Your Day Bloom with Happiness

Hello friends! Today, I’m sharing a clean and simple card that features the beautiful Alcea Hollyhock Flowers, which I thought would make the perfect choice for a Mother’s Day card. I paired it with a lovely sentiment from the Spring Flower Mother’s Day Friends Greetings set—this set is packed with so many wonderful sentiments, making it perfect for all your floral card creations!

I began by resizing and printing the image to suit my design, then colored it with Copic Markers and fussy cut it out. For the background, I used a diagonal stripe window die, which I adhered to a white A2 card base for a bit of texture. I added the image on foam tape to give it some dimension and make it pop. The sentiment was printed, trimmed, and also adhered with foam tape to give it a little lift, tying everything together beautifully.

Copics used:
V12-V15-V17
YG61-YG63-YG67


Thank you so much for stopping by! Wishing you a wonderful day filled with creativity and joy!


Thursday, March 20, 2025

Cozy Christmas Wishes

Hello friends! Today, I'm excited to share a Christmas card featuring Newton's Nook Frosty Folks paired with La-La Land Crafts Winter Hill Border Die. I hope you enjoy it!


I started with a panel of white cardstock and sprayed Tim Holtz Tiny Bauble and Merry Mint Mica Stains over it to create a fun, mixed media background. The vibrant colors really brought the design to life, and I absolutely love the added sparkle these stains provide! 


I then cut out the Winter Hill Border Die from white cardstock and adhered it to the stained panel. I colored the windows with a yellow Copic marker to add a warm touch.

Next, I stamped the Frosty Folks onto Neenah Solar White #80 cardstock and colored it with Copic markers. I then die-cut the image with the coordinating dies and popped it up on the panel with foam tape to create a fun, dimensional effect.

The sentiment was heat embossed on black cardstock using white embossing powder, giving it a striking contrast. I then adhered it to the panel with liquid adhesive to complement the design.


Thank you so much for stopping by! Wishing you a wonderful day filled with creativity and joy!


Roll with it

Hi friends! Today, I'm thrilled to share a fun and playful card featuring Artful Angel's newest release, Born 2 Plow, paired with the Never Change Your Stripes set from the February release. I had so much fun combining these sets to create a cheerful scene that I'm excited for you to see!


I began by stamping all of the images onto Neenah Solar White #80 cardstock. Afterward, I colored them with Copic Markers and used my Scan N Cut machine to cut them out.


For the background, I started by blending a soft blue sky using Distress Oxide Salty Ocean ink onto white cardstock. Once the ink blended smoothly, I cut it out using LDRS Creative's Slimline Scallop Die Set, which added a beautiful stitched border. To complete the scene, I created clouds and grass on the panel using Honey Bee Stamps Horizon Slimline Borders.

I then adhered the images to the panel using a combination of liquid adhesive and foam tape for added dimension. The sentiment was stamped in black ink directly onto the panel, tying everything together.


Thank you so much for stopping by! Wishing you a wonderful day filled with creativity and joy!

CHALLENGES:
SSS Monday Challenge - Transport it!
Park Hopping My Happy Place - Kilimanjaro Safari
Di's Digi - All About Animals


Wednesday, March 19, 2025

Happy Birthday

Hey friends! Today I'm sharing a Pig-tacular Birthday card that's sure to make you smile, featuring the adorable Alex Syberia Designs Hog Happy Day Stamp Set and paired with the Stitched Window Cover Die from Time for Tea Designs for extra charm!


I started by stamping the images and coloring them with Copic Markers. After cutting them out with my Scan N Cut, I took a panel of white cardstock and ran it through my die-cut machine using the Stitched Window Cover Die from Time for Tea Designs. 


Next, I adhered some fun polka dot paper to the back of the window panel and mounted it on a white card base. I popped up the images with foam tape, added a sweet sentiment, and finished off the card with some clear iridescent sequins for a bit of sparkle!


I had so much fun creating this card, and I really hope it brings a smile to your face!


Thank you so much for stopping by! Wishing you a wonderful day filled with creativity and joy!

CHALLENGES:
Allsorts - #819
Di's Digi - March*All About Animals
A Cut Above - March AG


Tuesday, March 18, 2025

Have the Best Day Ever

Hey there, friends! I’m so excited to share a card with you today, inspired by the Cards for All Seasons Instagram Hop! This week’s theme is Carnival Party, and I had so much fun creating a super vibrant and playful design! Keep reading to see all the colorful details and how I brought the carnival vibes to life! 


I started by digging through my paper stash to find a fun pattern that would work for my card, and I came across the perfect one from Honey Bee Stamps' Over the Rainbow 6x6 Paper Pad (discontinued). The colors and design were just what I was looking for! I trimmed the paper down to A2 size and adhered it to a white card base, setting the stage for the rest of the design. To add a little extra flair, I used Time for Tea Designs Wonky Window Cover Dies to create a fun, quirky cut-out on the paper, giving the card a unique and playful touch.

Next, I stamped the adorable images from La-La Land Crafts Best Day Ever Clear Stamp Set. These images are so cute and worked perfectly for the fun, cheerful vibe I was going for. I used my Scan N Cut machine to cut them out, but if you don’t have a machine, you can also use the coordinating dies available for this set.


Once the images were cut out, I colored them in with Copic Markers to bring them to life. After coloring, I added some dimension by popping the images up on foam tape, which added a little extra pop to the design. For the sentiment, I stamped it in black ink, then used La-La Land Crafts Scalloped Sentiment Labels Die to cut it out. I adhered the sentiment directly to the panel using liquid adhesive, making sure it stood out without overwhelming the scene.

And there you have it – a vibrant, carnival-themed birthday card that’s sure to bring the excitement and fun of a fair to someone’s special day! With all the bright colors and playful details, it's a perfect way to say "Happy Birthday" in a big, festive way!

Thanks for stopping by – I hope this card adds a little extra sparkle and joy to your day!


Crabbing' A Latte!

Just One Color IG Hop

Welcome to our Just One Color hop! We challenge ourselves to create cards that only use one color. You may see neutral colors in very limited use in addition because we may feel those are necessary to complete the card. If you'd like to play along, message @craftyengineer or @sharonjamesorama to join! To see all the creations, check out #justonecolorIGhop2025

The color for this month is RED. We also have an extra credit challenge this month: to add animals to our designs.


For my card I used Newtons Nook - Mugs Stencil blended with red ink and adhered to a red card base and for the extra credit, I added the adorable crabs from The Rabbit Hole Designs - Caffeinated Critter collection and the sentiment strips that coordinate perfectly with this set!


Thank you so much for stopping by! Wishing you a wonderful day filled with creativity and joy!

CHALLENGES:
Stencil Fun - AG March
Park Hopping My Happy Place - Parque del Cafe


Sunday, March 16, 2025

Well Latte-da!

🐝 Hi Friends! I’m absolutely buzzing with excitement today over this adorable Caffeinated Critter bundle set from Th Rabbit Hole Designs. There are so many cute critters to play with, and for my card, I just had to use the darling little bee paired with the Sip, Sip, Ahh Stencil. It’s the perfect combination for a fun, caffeinated card!


I started by cutting a panel of white cardstock and blended a mix of yellow and brown inks through the Sip, Sip, Ahh Stencil for a fun and textured background that gives off the perfect cozy vibe. Once the background was done, I stamped the adorable little bee inside the stained circle, then brought it to life by coloring it with alcohol markers for that perfect touch of brightness. 


For the next step, I used the You've Been Framed Layering Dies to cut out a beautiful frame, adhered it to a black mat for contrast, and then placed it all onto a cheerful yellow card base. To wrap things up, I chose one of the punny sentiment strips and popped it onto the panel using liquid adhesive, giving the whole card the perfect finishing touch!


Thank you so much for stopping by! Wishing you a wonderful day filled with creativity and joy!


Saturday, March 15, 2025

Happy Anniversary

Hi there, friends! We’re back with a brand new challenge at Beautiful Blossoms Challenge, and as always, it’s Anything Floral Goes! An optional mood board is available for extra inspiration. I can’t wait to see all your beautiful creations! Happy Crafting! 

For this card, I focused solely on the beautiful leaves from the Altenew Beautiful Day set to design a masculine Anniversary card for a friend. I wanted a more subtle, elegant look without the florals, and the leaves were perfect for that.


I began by stamping the image onto black cardstock using Versamark ink and heat embossing it with silver embossing powder for a sleek, shiny finish. Once the embossing was complete, I trimmed the panel to 2 1/4 x 5 1/2 inches and adhered it to the front of a gray card base. 

To add some contrast, I cut a sliver of Platinum from the Milky Way Gradient Cardstock by Altenew and attached it to the embossed panel, giving it a subtle pop. 

I used a sentiment from the Ambridge Rose set and heat embossed it in black embossing powder, and to finish off the design, I stamped a few red hearts for a touch of color and charm.

Thank you so much for stopping by! Wishing you a wonderful day filled with creativity and joy!

CHALLENGES:


Thursday, March 13, 2025

Happy Birthday, Little Monkey

Hi friends! I’m so excited to share more inspiration today featuring Lili of the Valley adorable new release, Safari and Farm Animals! This set is filled with the cutest critters that are sure to make you smile. From playful safari animals to sweet farm favorites, there’s a little something for everyone! 


I printed the images, colored them with Copic markers, and then cut them out using my Scan N Cut machine. Next, I took a panel of white cardstock and used a peekaboo window die to cut out a window in the center of the panel.

Next, I adhered the panel to a white card base and carefully arranged the images inside the window. Using liquid adhesive, I secured each one in place, creating a playful and dimensional scene that really brings the design to life.

I used two sentiments, printed them on white cardstock, then carefully trimmed them to size. After that, I adhered them to the card base, placing them just where they would perfectly complete the design.

Thank you so much for stopping by! Wishing you a wonderful day filled with creativity and joy!

CHALLENGES:
Park Hopping My Happy Place - The Jungle Cruise
Allsorts - #818
Die Cut Diva's - March *Critters