DISCLOSURE:

Several affiliate links are used in my posts. This means that, if you click on one of my links and make a purchase from that company, I will receive a small percentage of the sale without any additional charge. I appreciate your support greatly.

Saturday, May 31, 2025

New Release: Dragon Fun from The Rabbit Hole Designs!

Hi crafty friends! I’m so excited to share today’s magical news — it’s release day over at The Rabbit Hole Designs, and we are welcoming some seriously fiery fun with their newest bundle - Dragon Fun!

This whimsical new set features four absolutely adorable dragons, each full of personality and charm. Whether they’re breathing fire, curled up with a book, or getting into a little mischief, these cuties are ready to fly straight into your next card or project!

SHOP this release at https://therabbitholedesigns.com/CRAFTICARRI


To begin, I stamped the dragon image onto white cardstock, colored it with alcohol markers, and die-cut it using the coordinating die. I then created the background by ink blending a rainbow through the Beam of Light Stencil on a white panel. A stitched cloud was added to the bottom edge, and I stamped the sentiment from the set directly to the left of the cloud. The dragon was adhered with foam tape for a bit of dimension, and the completed panel was attached to a white card base.


Thanks for dragon by! Hope your day is fire-breathing fabulous!

CHALLENGES:


Affiliate Disclosure:
This post contains affiliate links, which means if you make a purchase through these links, I may earn a small commission at no extra cost to you. I only recommend products I truly love and use. Your support is greatly appreciated and helps me keep creating content for you!





Polkadoodles - Father's Day Bookmark

Hi friends! Today I’m sharing my final project as a member of the Polkadoodles Challenge Design Team—and it’s one that’s close to my heart.

This week’s challenge theme was Father’s Day—but no cards allowed! So, I created a fun and practical bookmark for my dad, who’s a huge fan of mystery thrillers and golf. Since he has a habit of folding the corners of book pages (yes, really!), this little Golf Gnome bookmark is both a sweet gift and a gentle nudge to keep those pages crisp!

It’s been such a wonderful experience being part of the Polkadoodles team—so much inspiration, support, and creativity every step of the way. I’ve loved being able to share my projects with you, and I’m incredibly grateful for this chapter in my crafty journey.

I hope this tee-rific little gift inspires you to create something special for the readers (and golfers!) in your life. Thanks for all the love and encouragement along the way!


Thank you so much for stopping by! Wishing you a wonderful day filled with creativity and joy!


Friday, May 30, 2025

Artful Angel Mermazing Friends Birthday Card

Happy Friday crafty friends! Today I am sharing more mermazing inspiration with the latest release from Artful Angel's Mermazing Friends paired with the Making Waves Sentiments.

I stamped the images on Neenah Solar White 110lb cardstock, colored them with Copics, and used my Scan N Cut for nice clean cuts.

The ocean background was made with Distress Oxide Inks in Blueprint Sketch and Peacock Feathers, then spritzed with water and run through the Seaside embossing folder from Stampin’ Up! for that fun wave texture.

I popped everything up on foam tape for dimension, including the fussy-cut sentiment to tie it all together!


I hope this card mer-made you smile! Thanks so much for dropping by — Sea you again soon! 

CHALLENGES:
As You Like it Challenge - Dry embossed, I love the texture


Wednesday, May 28, 2025

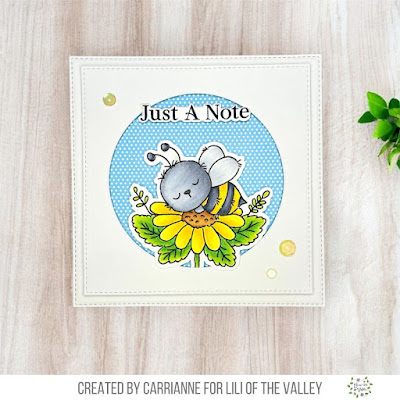
Just a Note to Brighten your Day

Hey there, crafty friends! Buzzing in with more sweet inspiration using the Hi Honey Stamp Set from Lili of the Valley! I kept it clean and simple with this card — just a little note to brighten your day!


Using Copic markers, I carefully colored the image and then cut it out with my Scan N Cut machine. I selected a delicate polka-dot patterned paper for the background.

I layered two white panels, cut with stitched square dies, with the smaller panel featuring a stitched circle peekaboo window that reveals the pattern beneath.


The image was adhered using foam tape to add dimension, and I added some subtle sparkle with a few clear iridescent sequins.

I appreciate you buzzing in — I hope your day is sweet as honey


Sunday, May 25, 2025

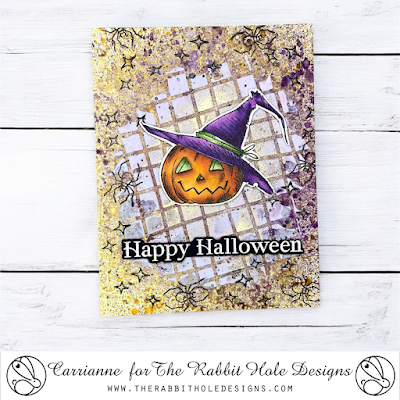
The Rabbit Hole Designs Sentimentally Speaking Holiday Bundle

Hi friends! Today I’m excited to share a fun mixed media card I created using the Sentimentally Speaking Holiday Bundle along with the Jack of All Faces set from The Rabbit Hole DesignsI played around with layers, textures, and bold color to bring this quirky combo to life! 


I started with a panel of watercolor cardstock, gave it a generous spritz of water, and then began layering shimmer sprays in purple and yellow. I dried each layer with my heat tool to build up texture, then added more shimmer spray to deepen the tones and give it that rich, gritty background I love.

Next, I colored some embossing paste with purple ink and applied it through a stencil for added texture and dimension—it really brought the background to life! Then I stamped the spider image from the Spooky Sightings set by The Rabbit Hole Designs to add a touch of Halloween creepiness.


I stamped the pumpkin, colored him with alcohol markers, and fussy cut him out before popping him up on foam tape for extra dimension. The sentiment was heat embossed with white embossing powder, cut with the matching die, and also adhered with foam tape to give it a bold pop against the background.

This card is packed with texture, shimmer, and a little spooky personality—just the way I like it!

Thank you for visiting—see you again soon for more crafty fun!

CHALLENGES:
Park Hopping My Happy Place - Halloween Horror Nights


Affiliate Disclosure:
This post contains affiliate links, which means if you make a purchase through these links, I may earn a small commission at no extra cost to you. I only recommend products I truly love and use. Your support is greatly appreciated and helps me keep creating content for you!


Thursday, May 22, 2025

Owl See You Again - Lili of the Valley Waving Hi Animals

Today, I’m sharing more inspiration featuring the adorable Waving Hi Animals from Lili of the Valley’s newest release! This collection is full of the sweetest critters that are perfect for sending cheerful hellos, warm wishes, and smiles across the miles.

I colored the adorable owl from the Waving Hi Animals set with Copic markers and fussy cut him out. Next, I took a panel of kraft cardstock and added texture using a woodgrain cover die—the perfect background for a woodland scene!

I then used a stitched circle die to create a peekaboo window in the center of the panel for the owl to perch in. To add depth, I blended some Distress Ink around the edges of the panel, then adhered it to a black card base for contrast.

The owl was popped up inside the circle with foam tape, and I added a few sparkly black embellishments for a bit of shine. To finish the card, I die-cut the sentiment using a fishtail banner and adhered it just below the owl.


I love how cozy and dimensional this little scene turned out!

Thank you for visiting. I hope my card brings a little smile your way today.

CHALLENGES:
Park Hopping My Happy Place - OwlPost at Hogmede at the Wizarding World of Harry Potter
Allsorts - #823 AG


Tuesday, May 20, 2025

Artful Angel Mer-Mazing Friends Gift Tag

I'm excited to share an adorable gift tag I created featuring the newest release from Artful Angel—Mer-Mazing Friends!


To create the background, I took a panel of watercolor cardstock and did some ink smooshing with blue and brown inks to give it a soft, under-the-sea look. I used the Large Gift Tags Die from @lalalandcrafts to cut the panel into a tag shape.

The sweet mermaid image is popped up on foam tape for dimension, while the sentiment is adhered directly to the panel using liquid adhesive. I finished it off with some neutral twine, tied at the top so it’s ready to hang!

Thank you for visiting—see you again soon for more crafty fun!


Saturday, May 17, 2025

Polkadoodles Challenge Inspiration - DT Card

Hi friends! Have you entered into the Polkadoodles Challenge yet? There is still plenty of time! It’s Anything Goes so you may share whatever crafty project you’ve been working on for a chance to win—there’s $80 in prizes each month! You’ve got four weeks to join in, so get creative and have fun!


My card this week was created for my uncle, who is retiring, and this BBQ, Chef, Cook Gnome was just perfect for the occasion! I had so much fun coloring him and bringing him to life. I used some patterned paper for the background, layered a stitched scallop die to make the gnome pop, and added a few fishtail flags to celebrate his big milestone.


Here’s to grilling up some relaxation and flipping to a new, exciting chapter in life! 

Copics used:
Gray: C00-C01-C02-C04-C05
Red: R35-R37-R39


Thursday, May 15, 2025

Camping: Because Therapy is Expensive

Hi friends! There’s something about this scene that just feels like home. I created it using the Glamping with Tailette Stamp Set from The Rabbit Hole Designs. 

As someone who finds peace in nature, I love being surrounded by trees - they bring that quiet kind of joy. We're currently camping through the weekend, so this card really captures where my heart is right now.


To create the scene, I first stamped the camper in the center of my card panel. I then stamped the tree image onto a post-it note, fussy cut it to create a mask, and used that mask to stamp a forest border. This technique helped keep the flow of the trees looking natural and layered. After stamping, I colored the images with alcohol markers and added a sentiment to finish the design.

And great news - Glamping with Tailette Stamp Set and Glamping with Tailette Dies are part of the monthly BOGO - buy one, get one FREE special! Just add both to your cart and one will be free—no code needed! 

Shop the Monthly Specials at The Rabbit Hole Designs 


Thank you for visiting—see you again soon for more crafty fun!


Affiliate Disclosure:
This post contains affiliate links, which means if you make a purchase through these links, I may earn a small commission at no extra cost to you. I only recommend products I truly love and use. Your support is greatly appreciated and helps me keep creating content for you!


Beautiful Blossoms Challenge #29

Hi there, friends! We’re back with a brand new challenge at Beautiful Blossoms Challenge Blog, and as always, it’s Anything Floral Goes! For extra inspiration, there’s an optional mood board available. I can't wait to see all your gorgeous creations! Happy crafting!

Hi friends. My card was inspired by an @altenew workshop I recently attended, taught by the talented Ishani. I loved her creative use of alcohol inks paired with the Bold Alphabet Dies—it was such a fun technique and a great way to use up supplies you might already have on hand. I had a blast putting my own twist on it, and I hope it inspires you to get creative too!


I began with a panel of Yupo paper, which is my go-to surface for working with alcohol inks. Its smooth, non-porous texture allows the inks to move and blend beautifully, creating organic patterns and vibrant color effects.

I applied a bit of isopropyl alcohol to the panel first to help the ink flow and blend more easily. Then I added Shades of Purple and Pocket Full of Sunshine alcohol inks, letting them swirl and mix across the Yupo surface. I used my alcohol ink air blower to move the ink around, creating beautiful, organic patterns. 

Next, I placed the letter "M" from the Caps Bold Alphabet Die Set onto the colorful panel and ran it through my die-cutting machine twice. I also cut the letter from Brushed Gold Metallic Cardstock to create a shadow effect, adding some beautiful dimension and shine behind the colorful die-cut.

To finish off the word "MOM", I swapped out the “O” for a layered bloom using the Craft-A-Flower Zinnia Layering Die Set. I cut the main flower from bright yellow cardstock and gave it a pop of personality with a polka dot pattern on the top layer. Once the pieces were glued together with liquid adhesive, I set the flower aside and turned my focus to building the background.


For the background, I chose two coordinating shades of purple. The lighter panel was dry embossed with the Ambridge Bouquet 3D Embossing Folder, adding beautiful floral texture and depth. I then matted it with a deeper shade of purple to create contrast and framed the entire piece on a soft light purple card base, tying all the tones together for a cohesive look.

To finish the card, I heat embossed the sentiment in Antique Gold Crisp Embossing Powder on the same light purple cardstock used for the base. I trimmed it down, cut a fishtail banner on the left side for added interest, and adhered it to the card with foam tape for a bit of dimension and a pop of elegance.


I hope you love my card! I’ll be hand-delivering it to my mom on Mother’s Day, which makes it extra special. Thanks so much for stopping by—I hope you feel inspired to create something colorful today!


Affiliate Disclosure:
This post contains affiliate links, which means if you make a purchase through these links, I may earn a small commission at no extra cost to you. I only recommend products I truly love and use. Your support is greatly appreciated and helps me keep creating content for you!


Excited to Share: AAA Colourful Challenge #16 Guest Spot!

Hello friends! What an honor it is to be the Guest Designer for AAA Colourful Challenge #16

I'm truly grateful for the opportunity and loved putting together something special for this colorful challenge. I hope my project sparks a little creativity and encourages you to join in the fun!

Join us for a new colourboard challenge: May 15 - June 14.


My card was inspired by an Altenew workshop I recently attended, taught by the talented Ishani. I loved her creative use of alcohol inks paired with the Bold Alphabet Dies—it was such a fun technique and a great way to use up supplies you might already have on hand. I had a blast putting my own twist on it, and I hope it inspires you to get creative too!


I began with a panel of Yupo paper, which is my go-to surface for working with alcohol inks. Its smooth, non-porous texture allows the inks to move and blend beautifully, creating organic patterns and vibrant color effects.

I applied a bit of isopropyl alcohol to the panel first to help the ink flow and blend more easily. Then I added Shades of Purple and Pocket Full of Sunshine alcohol inks, letting them swirl and mix across the Yupo surface. I used my alcohol ink air blower to move the ink around, creating beautiful, organic patterns. 

Next, I placed the letter "M" from the Caps Bold Alphabet Die Set onto the colorful panel and ran it through my die-cutting machine twice. I also cut the letter from Brushed Gold Metallic Cardstock to create a shadow effect, adding some beautiful dimension and shine behind the colorful die-cut.

To finish off the word "MOM", I swapped out the “O” for a layered bloom using the Craft-A-Flower Zinnia Layering Die Set. I cut the main flower from bright yellow cardstock and gave it a pop of personality with a polka dot pattern on the top layer. Once the pieces were glued together with liquid adhesive, I set the flower aside and turned my focus to building the background.

For the background, I chose two coordinating shades of purple. The lighter panel was dry embossed with the Ambridge Bouquet 3D Embossing Folder, adding beautiful floral texture and depth. I then matted it with a deeper shade of purple to create contrast and framed the entire piece on a soft light purple card base, tying all the tones together for a cohesive look.


To finish the card, I heat embossed the sentiment in Antique Gold Crisp Embossing Powder on the same light purple cardstock used for the base. I trimmed it down, cut a fishtail banner on the left side for added interest, and adhered it to the card with foam tape for a bit of dimension and a pop of elegance.

I hope you love my card! I’ll be hand-delivering it to my mom on Mother’s Day, which makes it extra special. Thanks so much for stopping by—I hope you feel inspired to create something colorful today!


Affiliate Disclosure:
This post contains affiliate links, which means if you make a purchase through these links, I may earn a small commission at no extra cost to you. I only recommend products I truly love and use. Your support is greatly appreciated and helps me keep creating content for you!


Wednesday, May 14, 2025

Doctor Digi's House of Stamps DT Card

Floating into the Golden Years! Today’s card is full of whimsy and celebration featuring Bertrands Balloon Break soaring high in a hot air balloon, embracing the joy of aging with style and spirit! It’s the perfect way to remind someone that getting older doesn’t mean slowing down—it means flying higher than ever.


I colored the image using Copic markers, then cut it out with my Scan N Cut machine. For the background, I used a panel of watercolor cardstock and applied the ink smooshing technique with soft, airy colors. Once dry, I ran it through my die cutting machine with a clouds embossing folder to add texture and dimension. I popped the image up with foam tape and trimmed the sentiment, adhering it with foam tape as well for a cohesive, lifted look.

Thanks so much for stopping by—I hope this card brought a little lift to your day!

CHALLENGES:
Double Trouble - #191 Pink Birthday
Die Cut Diva's - May *Watercolor background
Di's Digi Challenge - May *Make it for a male
Let's Craft & Create - #219 *No Pattern Paper


Tuesday, May 13, 2025

The Crafty Spotlight Hop - Altenew

Hi friends! Today I’m excited to be part of the Crafty Spotlight Hop on Instagram! This hop was created to shine a light on one amazing crafty company each month as a way to say a big THANK YOU for their creativity, dedication, and impact on our crafty community.

This month, we’re starting with none other than Altenew which couldn’t be more perfect as they’re celebrating 11 incredible years in the industry!

My card features the gorgeous Craft-A-Flower: Garden Rose Layering Die Set from Altenew - such a fun set to create with!


I started with a panel of watercolor cardstock and used the ink smooshing technique to create a soft, organic background. I dabbed ink onto my glass mat, spritzed it with water, and pressed my cardstock into the puddle to let the colors naturally blend. I heat-set each layer and repeated the process until I achieved a dreamy, layered wash of color. 


Next, I pulled out the Craft-A-Flower: Garden Rose Layering Die Set and die cut the pieces from shades of purple, pink, and green cardstock. For a touch of elegance, I used Brushed Gold Metallic Cardstock for the center of one flower. Thanks to Altenew’s clever keyhole system, assembling the blooms was quick and easy—I used liquid adhesive to layer the pieces, then added foam tape to pop them up for extra dimension. 

To finish, I added black ink splatters, stamped the sentiment, and adhered it with foam tape for even more depth. Everything was mounted onto a crisp white card base to keep the focus on the florals.


Thank you for visiting—see you again soon for more crafty fun!

CHALLENGES:
SSS Wednesday Challenge - Beautiful Blooms
Allsorts - #823 AG
Die Cut Diva's - May *Watercolor
Double Trouble - #191 Pink Ticket - Birthday 
Stamping Sensations - May *Feminine


Affiliate Disclosure:
This post contains affiliate links, which means if you make a purchase through these links, I may earn a small commission at no extra cost to you. I only recommend products I truly love and use. Your support is greatly appreciated and helps me keep creating content for you!


Thursday, May 8, 2025

Poinsettia Greetings with Sentimentally Speaking Holiday Bundle - The Rabbit Hole Designs

Hi friends! Today I’m back with more holiday inspiration featuring the beautiful Sentimentally Speaking Holiday Stamp Set and Die Set from The Rabbit Hole Designs. I paired it with the elegant Poinsettia and Pinecones Stamp & Die Set which is the perfect combination for timeless, festive designs.

I’m getting a jump start on next year’s Christmas cards, and these sets make it easy to create something classic and heartfelt. After all, it’s never too early to sprinkle in a little holiday magic!


I began by stamping the poinsettia and leaves, then coloring them with Copic Markers for a festive, detailed look. After coloring, I cut them out using the coordinating dies and set them aside.

For the background, I trimmed a piece of white cardstock to A2 size and added a 2" x 5 1/2" strip of red cardstock to the right side. I softly blended gray ink around the edges of the red panel to add depth, then adhered it with liquid adhesive.


Next, I die cut a grosgrain ribbon from black cardstock and adhered it to the left side of the red strip for a bold contrast. I arranged the poinsettia and leaves on the lower portion of the card and popped them up using foam tape for added dimension.

The sentiment was stamped in red ink, cut with the matching die, and placed centered above the poinsettias to balance the composition. To finish the design, I scattered a few gold sequins for a touch of festive sparkle.

Thank you for visiting—see you again soon for more crafty fun!

CHALLENGES:
SSS Wednesday Challenge - Beautiful Blooms