DISCLOSURE:

Several affiliate links are used in my posts. This means that, if you click on one of my links and make a purchase from that company, I will receive a small percentage of the sale without any additional charge. I appreciate your support greatly.

Wednesday, April 30, 2025

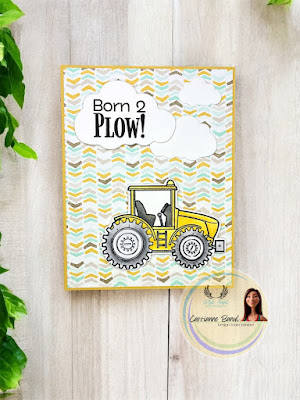
Born 2 Plow

Hi friends. I’m sharing more inspiration today featuring the Born 2 Plow Stamp Set from @artful.angel. This set is such a fun one to create with — perfect for adding a little charm and character to your cards! 

I started by stamping the image and coloring it in with my Copic Markers—these are always my go-to for blending and vibrant color. Once it was all colored, I used my Scan N Cut machine to precisely cut the image out. I picked out a fun, cheerful patterned paper from my stash and adhered it to a yellow card base to set the tone. I used foam tape to pop up the colored image, giving it a bit of dimension and interest. Then I die-cut a few clouds to add a playful touch and decided to stamp the sentiment directly onto one of the clouds for a sweet, whimsical finish.


Thank you so much for stopping by! Wishing you a wonderful day filled with creativity and joy!


CHALLENGES:
SSS Monday Challenge - Whatever the Weather
Crafts Galore - #135 May


Happy Birthday

Hi friends! Today, I'm sending big birthday cheer... even if this clown isn’t quite in the party mood!

Featuring Biffo digital stamp from Doctor Digi’s House of Stamps, this moody little guy is here to remind us that birthdays aren’t always about confetti… sometimes they’re about cake, deep sighs, and just surviving another trip around the sun.


I stamped the image and colored it with Copic Markers, then used my Scan N Cut to cut it out. I die-cut a stitched square and adhered a layer of vellum behind it to soften the look and add a touch of subtle texture. Then, I placed the square at an angle over a fun, colorful patterned paper for a playful background. The image was popped up with foam tape for added dimension.

The sentiment is from Doctor Digi's Birthday Sentiment Sheet 01 — a super handy set with a variety of fonts that makes cardmaking simple and stylish!


CHALLENGES:
Park Hopping My Happy Place - Storybook Circus


Sunday, April 27, 2025

My First Altenew Educator Workshop

Hi friends! Today I’m excited to share a card I created during my very first Altenew Educator Workshop! I went for a bold, grungy mixed media look featuring the beautiful Craft-A-Flower: Garden Rose Layering Die Set as the focal point. For added interest and texture in the background, I incorporated die cuts from the Bold Alphabet and Fine Alphabet Dies—they added just the right touch of depth and dimension to the mixed media layers.

If you missed the workshop, no worries! I’ll be hosting a LIVE video on my YouTube channel soon to walk you through the process and recreate the card. Be sure to subscribe to my channel at https://www.youtube.com/@crafticarri


Thank you so much for stopping by! Wishing you a wonderful day filled with creativity and joy!

CHALLENGES:
Classic Design - #4-2025


Joy of the Season

Hello everyone and welcome to the April edition of the Crushing Christmas Cards Hop, hosted by @bdk_creations! This month we’re making some clean and simple Christmas cards! The participants of this hop, and myself, want to inspire YOU to create your Christmas cards early, so if you would like to play along you can use #crushingchristmascards2025. While Christmas is a ways away, it’s always good to be prepared and get started early! If you would like to join our hop, please message @bdk_creations

My card today features the beautiful Berry Branch from Pinkfresh Studio, colored with Copic markers and adhered to a bold red panel for a clean and simple design. Sometimes all you need is a pop of color to let the image shine! 


Thank you so much for stopping by! Wishing you a wonderful day filled with creativity and joy!


Saturday, April 26, 2025

A Sweet Slice of Freedom (4th of July)

Hi friends! Today I’m sharing a sweet and cheerful card using The Rabbit Hole Designs Sentimentally Speaking Holiday Bundle and the One in a Melon Stamp Set

I love how this card feels like a little celebration on paper — simple, sweet, and full of summer energy.


I colored the watermelon slices with Copic Markers for a fresh, vibrant look. To add a bit of sparkle, I cut a strip of black glitter cardstock and adhered it across the panel underneath the watermelon. I then stamped the sentiment and used the matching die to cut it out, adding the perfect finishing touch to this playful, festive design.


Thanks so much for stopping by and letting me share a little red, white, and handmade with you!

CHALLENGES:
SSS Wednesday Challenge - Make it Girly


Tuesday, April 22, 2025

Having a Quacking Good Time with La-La Land Crafts April KOTM

Hi friends! ðŸ¦†✨ Just splashing by to share my latest card using the La-La Land Crafts April Kit of the Month! I used the adorable Quack-tastic Clear Stamp Set featuring two darling ducks having a quacking good time in a whimsical pond scene.

These cuties totally waddled into my heart—hope they bring a smile to yours too! 💛


Additional products used:
Spring Has Sprung Paper Pack

Copic Markers:
Ducks: W0, W2, W3, W5, W6
Feet and Beaks: YR04, YR07, Y15

CHALLENGES:
Crafty Gals Corner - #266 *ducks
Allsorts - #821 AG
Park Hopping My Happy Place - The Lucky Duck Ride


Monday, April 21, 2025

Our Friendship is the Best Adventure

Hi friends! I’m happy to be participating in the Just One Color Hop on Instagram today. The idea is to create a project using just one color, plus there’s a fun extra challenge: incorporate a transportation element into your design. Hope you enjoy what I made!

My card features @mft Best Adventure Bears, taking flight in their hot air balloon for an un-bear-lievable adventure! I just love how these adorable bears are soaring through the sky.


I began by stamping the image and bringing it to life with Copic coloring. After cutting it out with my Scan N Cut, I moved on to the background. I trimmed a white cardstock panel to 4 x 5.5 inches and softly blended blue ink in the center to create a dreamy sky. A few die cut clouds added the perfect finishing touch, and I adhered the image with foam tape to give it a bit of lift and dimension. Finally, I mounted the whole panel onto a teal card base, which really ties the colors together beautifully.


Thank you so much for stopping by! Wishing you a wonderful day filled with creativity and joy!


Sunday, April 20, 2025

Hello Friend

Hi friends! I had the best time crafting this 3D box card with Artful Angel’s Garden Gnomes and Never Change Your Stripes—they’re the perfect pair for creating a cheerful little scene!


I used the Heffy Doodle 3D Box Die set and combined it with some fun patterned paper to create this adorable scene. The images were colored with Copic Markers and carefully placed inside the box to give it a fun, dimensional look. So happy with how it turned out!

Artful Angel products featured:
Garden Gnomes
Never Change Your Stripes 
Born 2 Plow
Gardening

Thank you so much for stopping by! Wishing you a wonderful day filled with creativity and joy!


Saturday, April 19, 2025

Gift Tags for Mom

Hi friends! I’m so excited to share these two gift tags I made for my mom and MIL. They’ll be a cute addition to their gifts, but let’s be real… they might just end up loving the tags more than the presents themselves!

The first tag features the Bunny Rabbit with Mom Greeting Card, colored with Copic Markers and fussy cut out. I cut a panel using a tag die, added patterned paper from the Alcea Hollyhock bundle, and popped the image on foam tape. A cute polka-dotted ribbon finishes it off!

The second tag was super simple – I resized and printed the pre-colored image from Flower Meadows and added the sentiment from Spring Flowers Mother's Day Friends Greetings above it. I cut it out with a stitched circle die, punched a hole at the top, and added some twine. Doesn’t get easier than this!

Copics used:
C0-C1-C2
R00-R02
Y13-Y15
BG000-BG00
YG61
W0-W3


Thank you so much for stopping by! Wishing you a wonderful day filled with creativity and joy!


Friday, April 18, 2025

Happy Mother's Day - I Appreciate You

Good morning, friends! Today I’m sharing more inspiration using The Rabbit Hole Designs Sentimentally Speaking Holiday Bundle, which is just perfect for all your holiday crafting needs! 


I began with a white cardstock panel and placed the Paisley Bandana Stencil on top. After blending pink and yellow inks through the stencil to create a bright background, I used a stitched square die to cut it out, adding a polished finish.


To bring everything together, I adhered the inked panel to a black mat, then attached it to a white card base. I stamped the sentiment in black ink and used the matching die to cut it out. The sub-sentiment was heat embossed in white, trimmed, and placed beneath the main sentiment for a beautifully balanced design. I finished the card with a few black sequins to add a bit of sparkle.

Thank you so much for stopping by! Wishing you a wonderful day filled with creativity and joy!


Wednesday, April 16, 2025

You Color My World

Hi friends! I’ve got a sweet and colorful card to share using the Rainbow Gnome by Woodware Craft—this cheerful little guy is sure to brighten your day!


I began by stamping the image on Neenah Classic Crest Solar White 80 lb. cardstock, then colored it in using my Copic Markers. I trimmed the panel to 3.75" x 5" and stamped the sentiment directly onto it in black ink. I then layered it over a scalloped panel cut with the MFT Eyelet Scalloped Stax die. I used liquid adhesive to attach the layers and mounted everything to a white A2 card base.


Thank you so much for stopping by! Wishing you a wonderful day filled with creativity and joy!


Have a Super Birthday

I’m beyond excited to share my very first card as a design team member for @doctordigishouseofstamps! I’ve been a huge fan of their quirky, whimsical images and clever, pun-filled sentiments for quite some time, so it’s such an honor to now be creating with these fun designs. 

My first card features the hilarious Captain Thunderpants paired with the Comic Sentiments! Seriously, if this image doesn’t put a smile on your face or at least make you laugh, I’m not sure what will. It’s such a fun, quirky design, and I had an absolute blast coloring it in. 


I started by coloring the adorable Captain Thunderpants image with Copic Markers, then printed and carefully cut out the Comic Sentiments to pair with it. 

For the backdrop, I used the Slimline Marquee Die from Whimsy Stamps, cutting it once from bold red cardstock and again from vibrant, colorful stars paper. This created a striking contrast with the negative spaces, allowing the bright starry pattern to peek through the marquee openings. I carefully adhered the die-cut pieces to a white slimline card base, measuring 8 1/4 x 3 1/4 inches, which provided a perfect long canvas to showcase the design.


To give the design some extra dimension, I popped the images up on foam tape, allowing them to stand out. Finally, I added a few shiny star sequins for a bit of sparkle and whimsy to complete the card.


Thank you so much for stopping by! Wishing you a wonderful day filled with creativity and joy!

CHALLENGES:
SSS Wednesday Challenge - Pattern Paper
Park Hopping My Happy Place - Marvel Superhero Island
A Cut Above - April AG


It's a Good Day To Be Happy

I’m absolutely honored to be guest designing for Ellibelle's Corner: I Spy With My Little Eye Challenge this month! It’s such a pleasure to be a part of this amazing community. 

For my card, I’ve used one of the sweet floral images from Hi, Honey which is one of the latest releases over at Lili of the Valley. The collection is full of beautiful designs, and this particular floral image was so much fun to work with. Go check it out!


I began by coloring the images with Copic Markers, then carefully cut them out using my Scan N Cut machine for a clean, precise finish. For the background, I took a panel of white cardstock and blended green ink, fading it toward the bottom to create a soft, grassy gradient. I then used a grass die to cut the bottom of the panel and adhered it to a white card base for a seamless look.

Next, I moved on to the Garden Fence Die from La-La Land Crafts. I cut it out from another piece of white cardstock and adhered it behind the grass die with foam tape to give it some dimension and create depth.

To complete the scene, I popped up the colored images on foam tape to add dimension and create visual interest. The sentiment, from Hello Bluebird’s Rainbow Script Stamp, was stamped directly onto the panel in bold black ink to tie everything together.

I love how the layers and textures came together to create a fun, dimensional scene for this card!


Thank you so much for stopping by! Wishing you a wonderful day filled with creativity and joy!

CHALLENGES:
Die Cut Diva's - April *Flowers
Stamping Sensations - April *Flowers


Tuesday, April 15, 2025

Thank You

Hi there, friends! We’re back with a brand new challenge at Beautiful Blossoms Challenge, and as always, it’s Anything Floral Goes! For extra inspiration, there’s an optional mood board available. I can't wait to see all your gorgeous creations! Happy crafting!

For my card, I reached for the beautiful Pinkfresh Studio Spark of Goodness Stamp, Stencil, and matching die set. The stamp and stencil worked perfectly together to create a vibrant, layered design, and the coordinating die made cutting out the pieces so easy.

I began by stamping the floral image, then placed the coordinating stencil on top to add color in beautiful shades of yellow and green. Once I was happy with the coloring, I used the matching die to carefully cut it out. For the background, I took a separate white panel and ran it through my die-cutting machine with the Spring Leaves A2 Pierced Cover Plate from Honey Bee Stamps. This added a lovely textured, detailed backdrop that really complements the floral focal point.

Next, I adhered the focal panel to the textured backdrop using liquid adhesive, then attached the whole piece to a white card base for a clean and crisp look. To add dimension and a bit more interest, I placed the smaller floral image in the center using foam tape.


For the sentiment, I chose the Altenew Elegant Sayings set, heat-embossed in stunning gold embossing powder. I then cut it out with the matching die and adhered it to the panel using foam tape to give it a little extra lift and dimension.

Thank you so much for stopping by! Wishing you a wonderful day filled with creativity and joy!


CHALLENGES
Allsorts - #821 *Stencil
Di's Digi Challenge - April *Load on Flowers


Affiliate Disclosure:
This post contains affiliate links, which means if you make a purchase through these links, I may earn a small commission at no extra cost to you. I only recommend products I truly love and use. Your support is greatly appreciated and helps me keep creating content for you!


Sunday, April 13, 2025

Congrats!

Hi friends! Today I’m so excited to share this fabulous pop-up card I created as part of a workshop by the amazing Liz O. I was absolutely thrilled when she decided to offer this workshop again! 

I followed Liz’s step-by-step instructions (which were incredibly easy to follow and so well put together), but I couldn’t help but add my own little twist. I dry embossed the front panel with Basket Weave Embossing Folder from Stampin' Up! using Rose Red cardstock to introduce some extra texture and dimension. I think it really brings the card to life and adds that special touch, don’t you think? 


For the floral element, I used the Craft-A-Flower Zinnia Layering Die Set because I love them for their vibrant colors and they belong to the daisy family and who doesn't love daisies?! The layers come together so beautifully with the help of Altenew’s keyhole system, which makes it super easy to line everything up just right. It really takes the guesswork out of layering and allows the intricate details of each petal to shine. Once assembled, the flower truly comes to life with such dimension and elegance—it’s definitely one of my favorites!

Before assembling the flowers, I made sure to incorporate the beautiful color palette from Altenew's Inspiration Challenge into my card design. To bring out more depth and dimension in the flowers, I softly blended Frosty Pink and Cosmic Berry from the Red Cosmos Fresh Dye Ink set. This gentle, seamless gradient added a soft, natural touch to the petals, giving them a rich, warm feel while allowing the layers to truly shine and make the design pop!

The sentiment was die-cut from gold metallic cardstock for a touch of elegance and again from rose red cardstock to tie in with the overall color scheme. I layered the two pieces together using liquid glue to add some dimension, creating a subtle shadow effect. Once assembled, I adhered the sentiment directly to the bottom of the card, giving it a bold and eye-catching finish that perfectly complements the rest of the design.


A huge THANK YOU to Liz for sharing this workshop and continuing to inspire the crafting community with her amazing talent. I had so much fun putting this card together and can’t wait to try another version soon!

Thank you so much for stopping by! Wishing you a wonderful day filled with creativity and joy!

CHALLENGES:
Allsorts - #821 AG
Crafty Calendar - April *Feminine
Di's Digi - Load on Flowers
A Cut Above - April 
Stamping Sensations - April *Flowers
Aud Sentiments - #324 *Dry Embossed/Flowers
As You Like it - *Floral I love Zinnias for their vibrant colors
Triple B - *Blooms


Thursday, April 10, 2025

Happy Easter

Hi friends! Today, I'm excited to share some more inspiration with you, featuring the Sentimentally Speaking Holiday collection from The Rabbit Hole Designs, paired with the stunning Mindful Magnolias. I hope you love the combination as much as I do! 


I started by stamping the beautiful Mindful Magnolias onto a panel of white cardstock and then coloring them with alcohol markers. After cutting it out with a stitched circle die, I blended some soft blue ink along the edges for a subtle touch. I stamped the sentiment in black ink directly over the floral image. 

For the background, I cut strips of various shades of blue cardstock and adhered them across a white card base. To add some dimension, I popped the stitched circle up on foam tape and finished it off with a few yellow sequins for a little sparkle!


Thank you so much for stopping by! Wishing you a wonderful day filled with creativity and joy!

CHALLENGES:
Die Cut Diva's - April *Flowers


Wednesday, April 9, 2025

I'm So Glad You Swam To Me

Hi friends! Today, I’m diving into some ocean-inspired fun with Lili of the Valley’s Under the Sea set!  These adorable sea creatures are making a splash on my card creations!


I colored these adorable sea creatures with Copic markers and carefully cut them out using my Scan N Cut. For the background, I chose a beautiful water-pattern paper from the Sand, Surf & Sky Paper Pad by My Favorite Things. 

To add some dimension, I layered it with a white cardstock panel cut using the Stitched Window Cover Die from Time for Tea Designs. I popped the sea creatures up on foam tape for some extra dimension, then stamped the sentiment from a Tracey Hey set and cut it out with a stitched strip for that perfect finishing touch! To make the card really shine, I scattered a few dew drops here and there!


Thank you so much for stopping by! Wishing you a wonderful day filled with creativity and joy!

CHALLENGES:
Crafty Calendar - *Feminine
A Cut Above - April *window die